![How to Join Crochet Squares [Best Ways to Join Granny Squares]](https://yourcrochet.com/wp-content/themes/kadence-child/assets/new/img/page-banner.png)
In this article:

Joining your crochet pieces together is a crucial skill, allowing you to create larger projects and achieve a polished finish. Let’s explore some joining techniques, that will help you combine two squares together, or create granny square blankets.
How to Crochet Squares Together
There are many ways to join your squares, the most common of which is the slip stitch method, the mattress stitch, and the single crochet join.
Most paid and free crochet patterns include written instructions or a video tutorial for the specific join methods used in a project. However, it’s good to have these 3 easy ways under your belt.
Mattress Stitch Join Tutorial
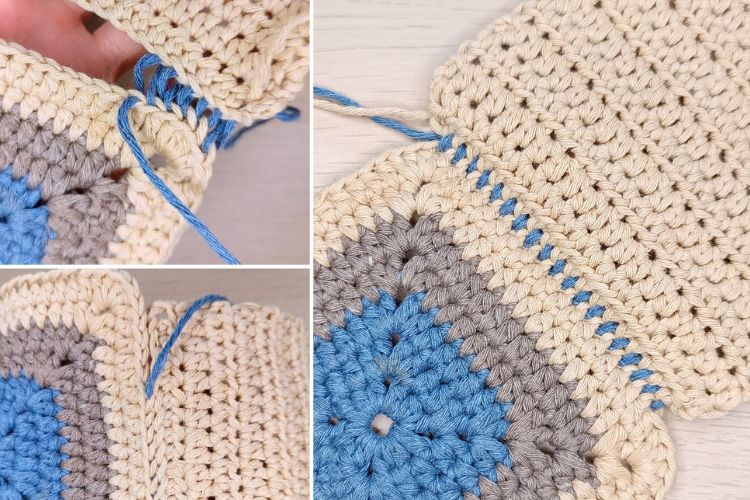
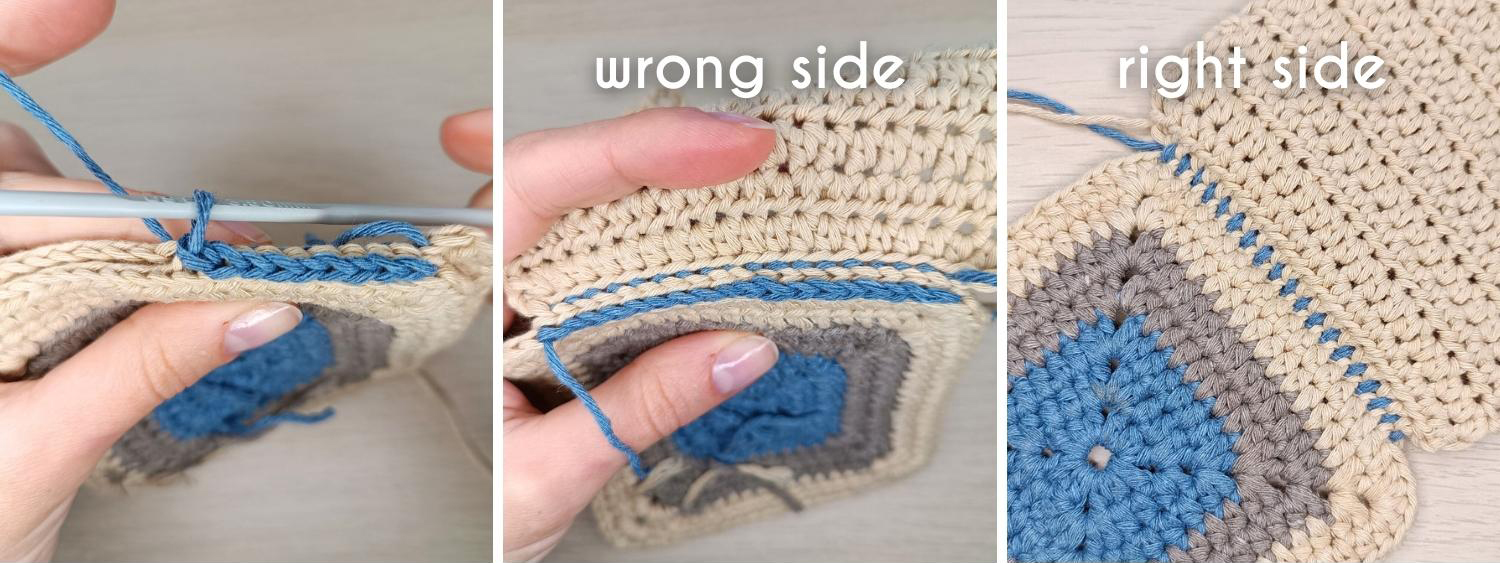
The mattress join is a nearly invisible seam that’s ideal for joining squares, motifs, or other crochet pieces with straight edges. It creates a flat, smooth seam on both sides of your work.
How to Join Crochet Squares with the Invisible Join
This type of join becomes invisible, which makes it the neatest way to join crochet squares.
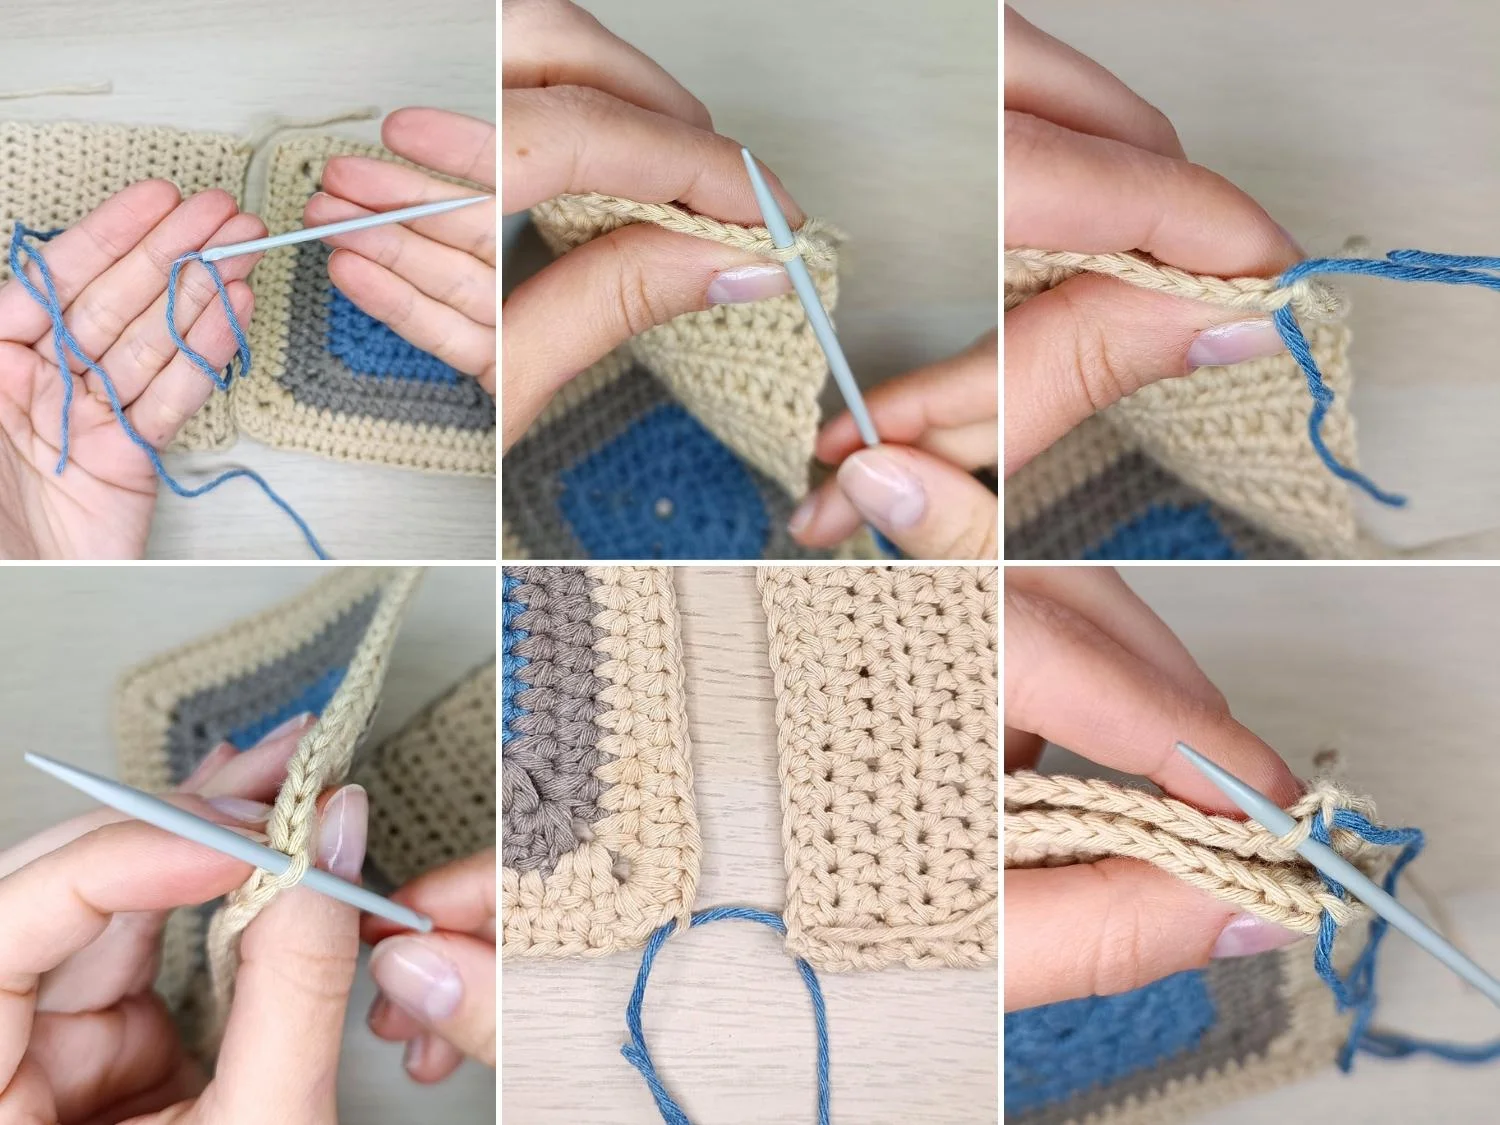
- Thread a yarn needle with a length of yarn that matches your crochet pieces.
- Lay the two pieces you want to join side by side, with the right sides facing you.
- Insert the yarn needle from front to back into the corner stitch of the first piece and pull it through, leaving a small tail.
- Move to the corresponding corner stitch on the second piece and insert the yarn needle from front to back.
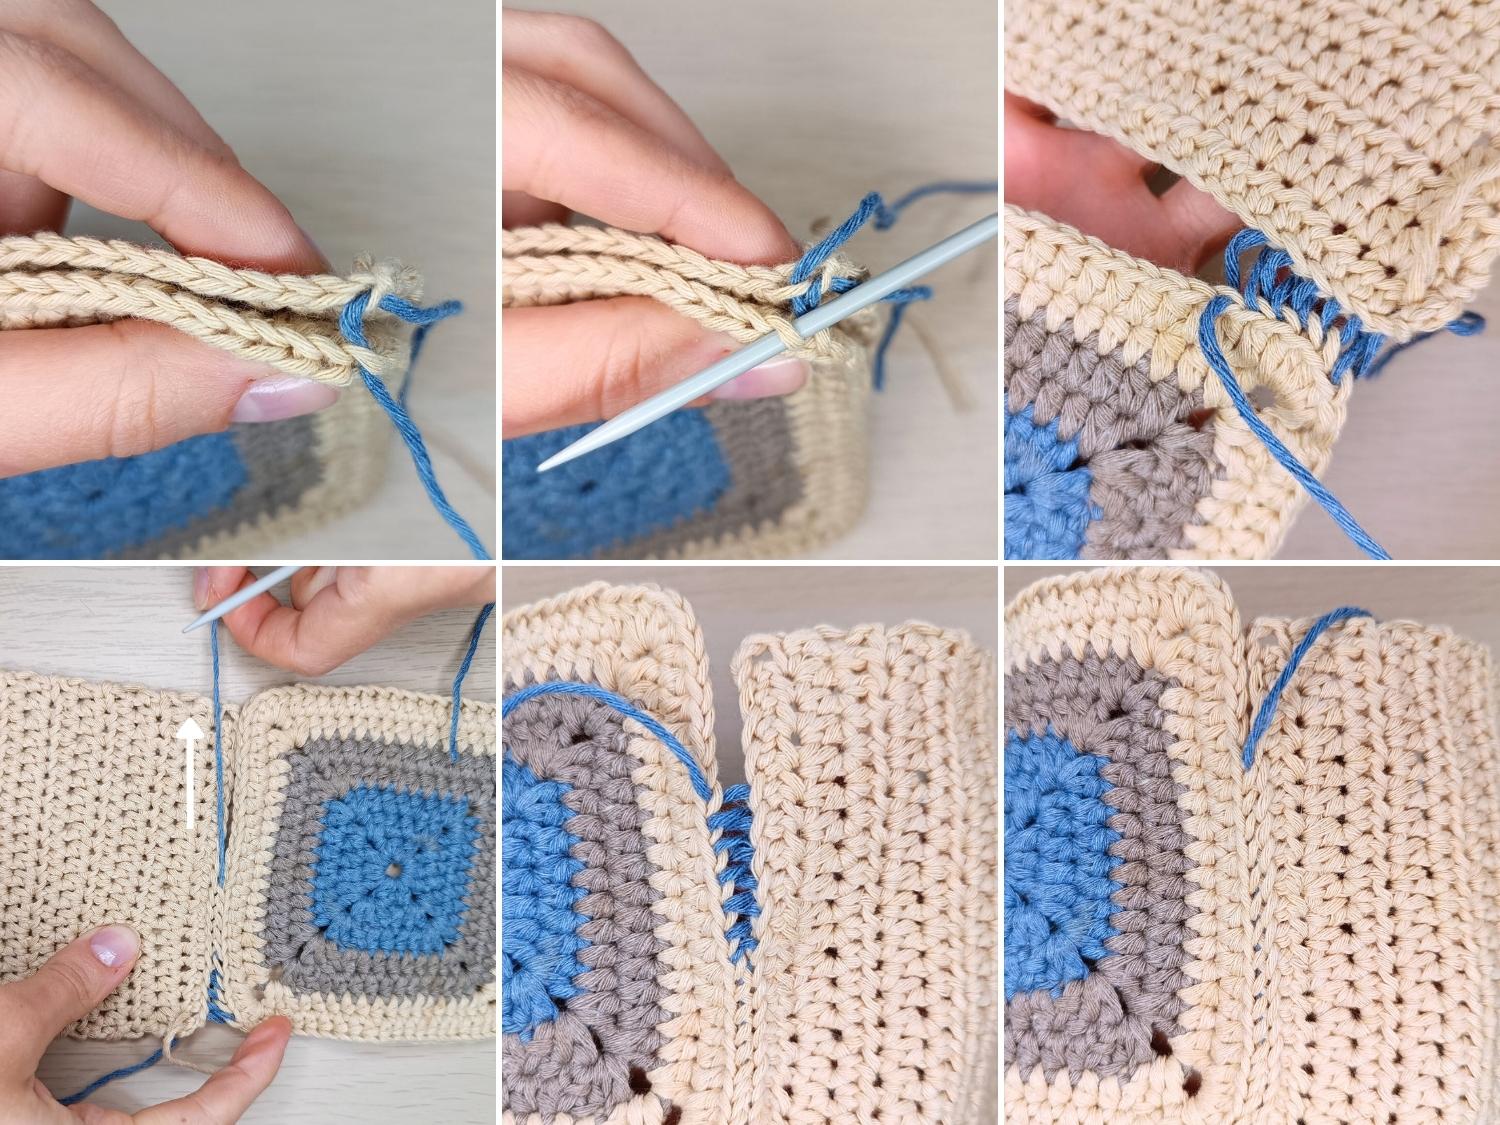
- Working from right to left, insert the needle into the next stitch on the first piece, then into the corresponding stitch on the second piece, alternating between the two pieces.
- After every few stitches, gently pull the yarn to tighten the seam, but not too tightly to avoid puckering.
- Repeat the weaving process until you reach the end of the seam. Secure the yarn by making a small knot on the wrong side of your work, and weave in the ends.
The result of this join is nice and flat, where one square touches another in a seamless manner.
Slip Stitch Join Tutorial
The slip stitch join is a simple and quick method of joining squares with slip stitches. It works well for joining motifs or rounds in projects like blankets or doilies.
How to Join Crochet Squares with Slip Stitch
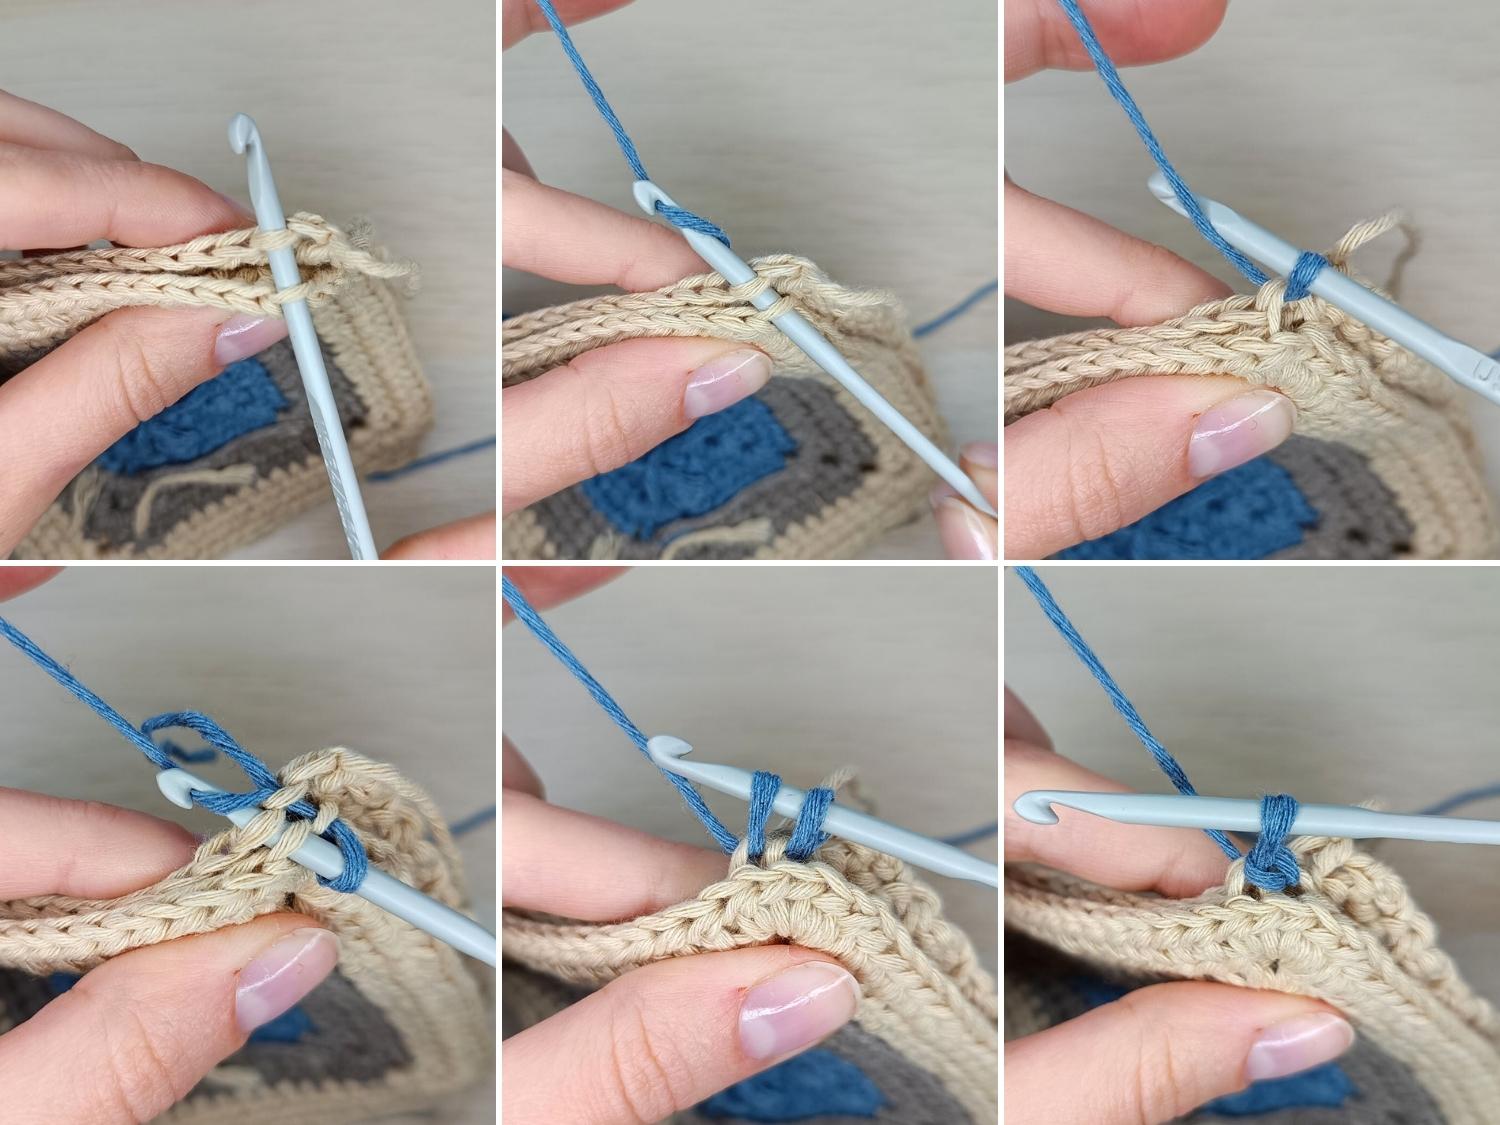
- Align two pieces you want to join, right sides facing towards each other.
- Insert hook into the first stitches (through the center loops only), from front to back.
- Yarn over and pull through both stitches. You’ve got one loop on your hook.
- Now insert your hook in the next pair of stitches and pull up a loop. You’ve got two loops on your hook.
- Without yarning over, pull the second loop through the first loop, as in a regular slip stitch.
- Repeat the steps in each corresponding stitch, working around the entire piece.
- When finished, fasten off, leaving a tail for weaving in the end. Turn the piece right side up and flatten it.
Remember to match the number of stitches in both pieces, so they end up aligned properly.
Other Joining Techniques
Join-As-You-Go (JAYG)
Contrary to other methods, this way of joining doesn’t involve seaming crochet squares. You join them together as you crochet, whether it’s a blanket pattern, hexagon project, or cosy home decor. There are many variations of this method, but most require you to crochet around the square to attach another one.
Single Crochet Join
This easy crochet seaming uses a basic single crochet to create a raised join. If you make a blanket, it’s an easy way to add texture to the project.
Whip Stitch Join
Another seaming technique uses a tapestry needle and yarn to combine panels together. This easy method creates a visible join, often used in sewing and embroidery.
What is the best method for joining crochet squares?
The choice between these joins depends on the project and the look you want to achieve. The mattress stitch creates a nearly invisible seam, while the slip stitch join adds a decorative edge. Experiment with both techniques to find the one that suits your project best.
FAQ
How to seamlessly join crochet?
You can invisibly join squares using the mattress stitch.
What is the best stitch to join granny squares?
Many joining techniques will look good with granny squares, so it’s a matter of personal preference. It will look great with joins incorporating basic stitches because granny squares use double crochet stitches and stitch clusters. Any invisible join will be fine, too, but always consider what you’re making and what you need.
Should I block my squares before joining?
Blocking individual pieces is much easier than blocking an entire blanket. Depending on the scale, hook size, and type of yarn, drying a crochet blanket flat may be a challenge. That’s why you should go for blocking squares individually, either on a foam mat or a blocking station.
What is the most secure way to join granny squares?
Any seam can be sturdy if you properly tie and hide the ends. To avoid gaps between the squares, go for seaming techniques, or use a sturdy crocheted technique, such as a single crochet join.