
In this article:

This post contains affiliate links.
A written crochet pattern is a set of instructions that tell you which crochet stitches to use, when to use them, and where. Once you have mastered the basics of understanding and reading a crochet pattern you will be able to pick up almost any pattern and recreate the design as the designer intended.
Reading a crochet pattern can sometimes feel like decoding a story, but don’t worry! Split up each section and line, so that the story is in more manageable chunks and before you know it you will have crocheted a beautiful item without even realizing it.
In this article, you will not only learn how to read a crochet pattern but also how to write your own. Discover the essential aspects every pattern should have and how to effectively use each part of a written pattern.
Find the best selection of quality yarns for crochet in Katia’s online store.
You may also like:
- How to Read and Write Crochet Diagrams
- The Best Yarn for Crochet Blankets
- How to change colors in crochet
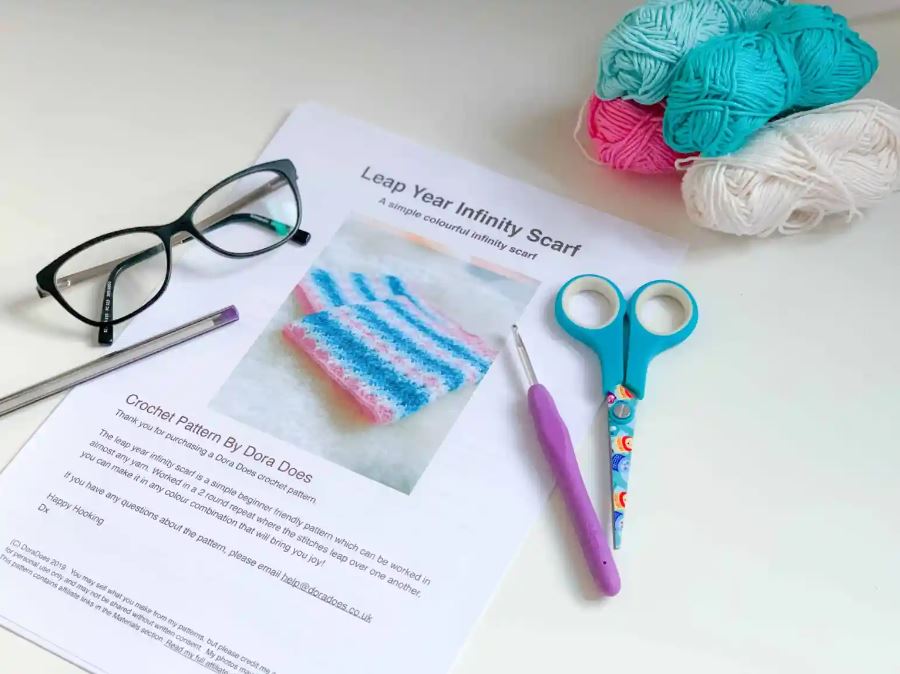
photo from doradoes.co.uk
Reading a crochet pattern
We know you want to dive straight in and find out how to read the pattern instruction but a good pattern will always come with a lot of other vital information before the pattern itself.
It’s important to take some time to read through this information, it will save you time later and give you a good indication of what you can expect whilst creating your crocheted item.
So, what can you find in a good crochet pattern?
Information at the beginning of your crochet pattern should include: (we will explore each section in more detail below)
- Pattern Notes
- Skill Level
- Materials
- Measurements and sizing
- Gauge
- Stitch Abbreviations
- The Pattern
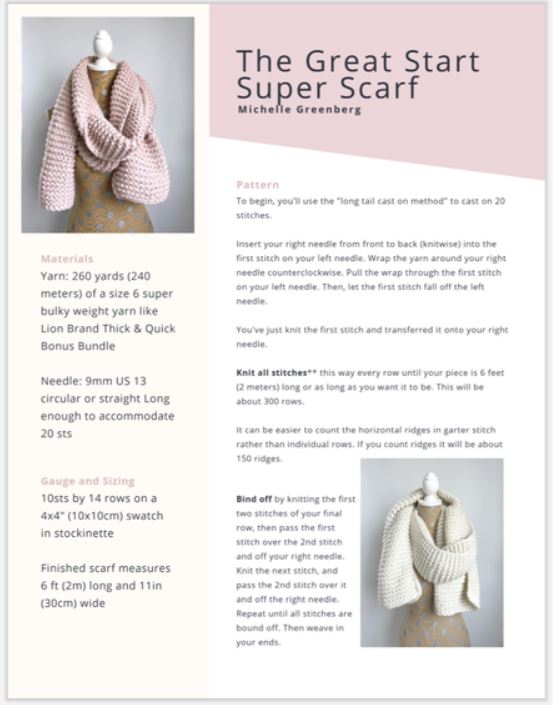
photo from thesnugglery.net
Pattern Notes
These are an overview of the pattern and give explanations of differences that can sometimes occur within crochet patterns. For example, turning chains do/do not count as stitches.
You will usually find out about the construction of the item in this section e.g. is it top-down, worked in the round, or in panels.
Skill Level
The skill level indicates the pattern’s difficulty and can give you a good insight into how complicated the pattern will be. Whilst learning how to read crochet patterns choosing a pattern labeled easy or beginner is a good choice.
Materials
The main ingredient for any crochet project is of course yarn, every pattern will specify what yarn to use along with yarn weight and how much you will need to complete the project.
This section may also include what you should have in your notions bag.
Measurements
Measurements of the finished items should always be included in a pattern.
The type of measurements depends on the project. It may just be a simple finished length and width of a blanket. Garment measurements may be more complicated and include a schematic to help understandability.
Sizes
Sizes come hand-in-hand with measurements. When reading a pattern for a garment it will usually include a variety of sizes which are written S(M, L). Throughout the pattern, you will see reference to this e.g. Ch 24(26, 28) meaning chain the number of stitches that corresponds to the size garment you are making.
It’s recommended to highlight the size you are working to throughout your pattern so you don’t get confused.
photo from crochetpedia.com
Gauge
The gauge can be extremely important depending on what pattern you are using. Gauge tells you how many stitches you should have within a certain area of your work.
By not getting the correct gauge you risk your project being too big or small, not ideal if you are making a garment. For this reason, it is important to always create a gauge swatch before starting your project.
Stitch abbreviations
Before starting any project is it important to know if your pattern is written using US or UK crochet terms, while the abbreviations are the same the stitches are slightly different.
Next, you need to familiarize yourself with the stitch abbreviations that you will come across whilst reading your crochet pattern.
Here are the basic stitch abbreviations:
| Ch | Chain |
| Sl st | slip stitch |
| Sc | single crochet |
| Hdc | half double crochet |
| Dc | double crochet |
| Tr (or trc) | triple (or treble) crochet |
You will also come across the following abbreviations which indicate an action during crocheting.
| Inc | increase (Add one or more stitches.) |
| Dec | decrease (Get rid of one or more stitches.) |
| Turn | Turn your work so you can work on the next row. |
| Join | Join two stitches together; usually done by slip stitch |
| Rep | repeat (Do it again.) |
The Pattern
The part we’ve all been waiting for. This is where you will follow instructions to create your crochet masterpiece.
Read the pattern line-by-line and take your time. Designers may write the same instruction in slightly different ways. If needed you can always make notes and write out parts of a pattern to make it easier to understand and follow. For example, if a pattern says continue for 5 rows I will write out the numbers 1-5 and cross off each row as I complete it.
Most patterns contain a stitch count at the end of each line of instructions. This helps you keep on track, as you can check your work by counting your stitches. If your crochet and the stitch count don’t add up go back and make sure you haven’t made a mistake.
Stitch counts are usually written like the examples below.
: 14 sc. or (14 sc). or —14 sc.
Important pattern terminology
Patterns use a range of different formatting to help save space when writing the pattern these include:
* An asterisk -These are used when part of the pattern needs to be repeated. Repeat the stitches within the asterisks.
( ) Parentheses – These indicate a group of stitches that need to be working into the same space or stitch.
[ ] Brackets – Provide additional information for example if a chain is counted as a stitch or not.
Continue in Pattern (Patt) as Established – This means to continue crocheting the pattern as you have been doing.
Finish off or Fasten off – This means cut the yarn, leaving a long tail.
Right Side/Wrong Side- Refers to which side of your work you are working on.
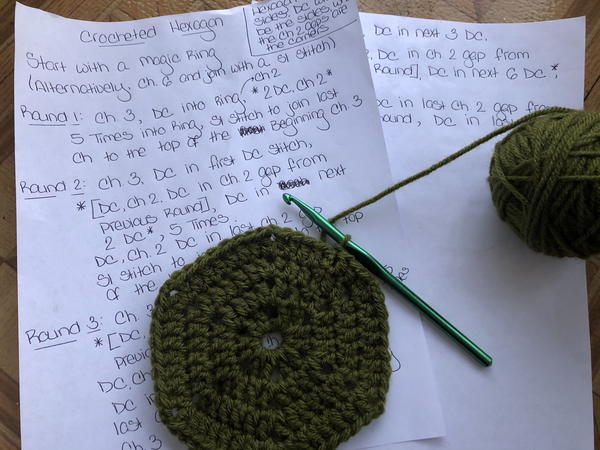
photo from allfreecrochet.com
10 Tips for Reading Crochet Patterns as a Beginner
- Start with Simple Projects – As a beginner, choose patterns that are labeled as “easy” or “beginner-friendly.” These patterns are typically written in a straightforward manner with minimal complexity.
- Read Carefully – Take your time to read the pattern instructions carefully, one line at a time. Visualize each step in your mind before you begin.
- Highlight Key Information – Use a highlighter or colored pencil to mark important details, such as stitch counts, repeat sections, or changes in yarn color.
- Count Your Stitches – Always count your stitches at the end of each row or round to ensure you have the correct number. This helps you catch mistakes early.
- Use Stitch Markers – Place stitch markers at the beginning of rounds or in specific places as indicated by the pattern. This makes it easier to keep track of your progress.
- Practice Swatching – Before starting a larger project, create a practice swatch using the same yarn and hook. This allows you to familiarize yourself with the pattern’s stitch sequence and gauge.
- Ask for Help – Don’t hesitate to seek help from more experienced crocheters or online communities if you encounter difficulties or have questions about a pattern.
- Stay Patient – Crochet patterns can be intricate, and mistakes can happen. If you make an error, don’t be discouraged. Frogging (undoing your work) and trying again is a natural part of the learning process.
- Keep a Pattern Journal – Consider keeping a crochet pattern journal where you jot down notes, make annotations, and record your progress on each project. This can be a valuable reference for future endeavors.
- Practice Makes Perfect – Like any skill, reading crochet patterns becomes more intuitive with practice. Start with simple patterns and gradually work your way up to more complex projects as your confidence grows.
How to write your own crochet pattern
The thought of writing your own crochet pattern may seem quite daunting but the best advice is to start simple. Practice writing out the instructions to patterns you already know e.g. a granny square to develop an understanding of the writing process and how to explain certain aspects of the pattern.
Follow these steps to help get you started:
1. Design
Decide what you want to make for your crochet pattern. Get creative and experiment with your hook and yarn for crochet. You may come up with an idea and design you never considered.
Use cheap yarn during this step as it is more robust, there will definitely be a lot of ripping out and re-crocheting during this step.
2. Keep a notebook
Make sure to keep a notebook just for your crochet designs. Write down everything you do and try as you never know what is going to work and you don’t want to forget a vital piece of information.
Use a pencil rather than a pen so that you can rub out mistakes easily.
Be prepared for your notes to get messy, re-write them out on a fresh page to help organize your thoughts as your design progresses.
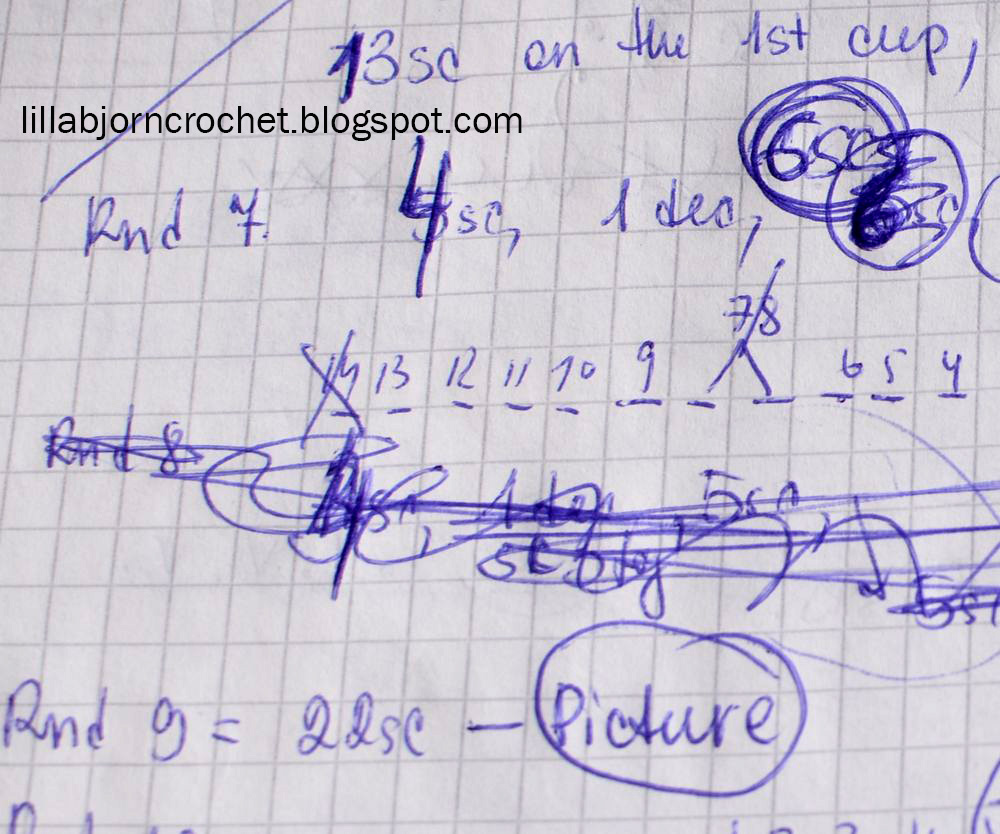
photo from lillabjorncrochet.com
Once you have completed your project, remake it again, using your notes to write out a final pattern outline.
3. Crochet Abbreviations
Make sure to use standard abbreviations throughout your pattern so that anyone who reads your pattern is able to fully understand what you are asking them to do.
4. Write out the final pattern
When writing out your final pattern make sure to give it a catchy name and include a photo of the finished item at the beginning.
Next include all the sections we have spoken about in the ‘how to read a crochet pattern’ section of this article.
At the end of your pattern add copyright information explaining how people can use your pattern and if there are any restrictions such as reselling.
5. Test your pattern
Once you have finished writing out your pattern and checked it for mistakes it’s recommended that you have your pattern tested. You can ask some willing friends, or look for pattern testers on Ravelry, as there are lots of groups with people waiting to test your pattern.
–
We would love to see the wonderful items you make with your new skills, so share your work in our Facebook group!