
In this article:

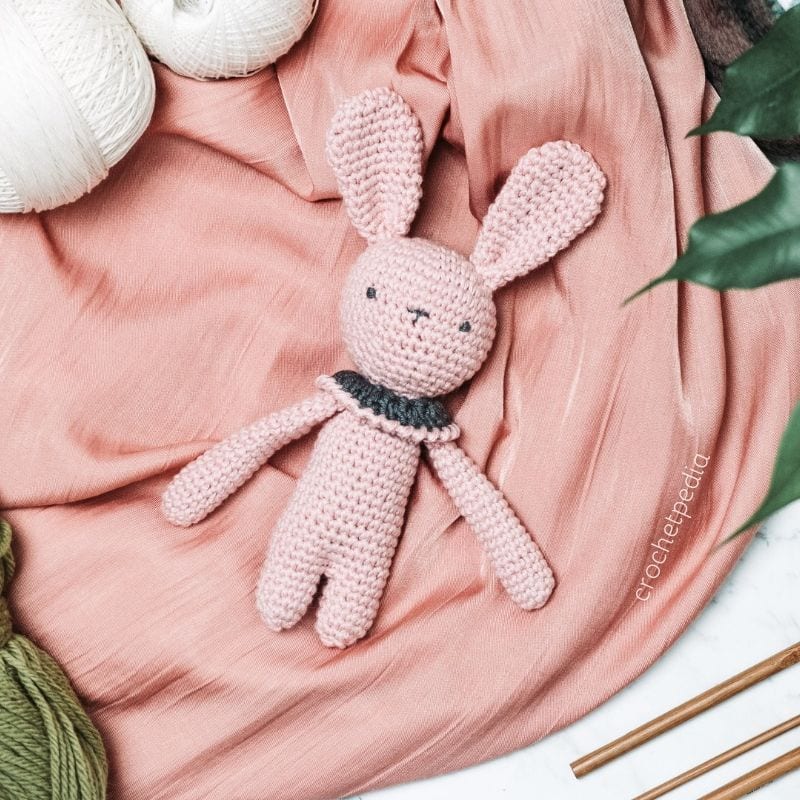
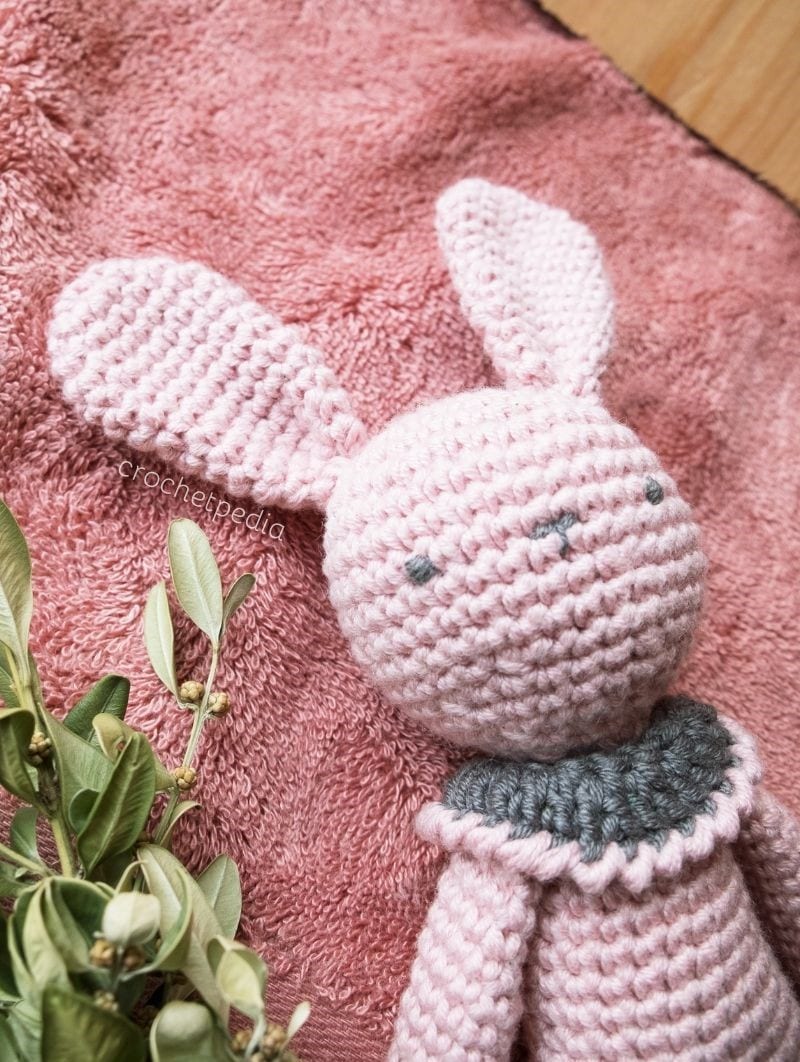
This cute little bunny can be a lovely gift for a kid or sentimental amulet for an adult. Little piece of your heart goes to the things you crochet, so there is nothing better than a handmade present. Rose Bunny fits in your pocket nicely, and loves being among others!
This project is available on Crochetpedia and Ravelry.
Amigurumi beginners shouldn’t have problems with this project, especially if they have already tried basic techniques, such as increase and decrease. Step-by-step instructions should make it even easier to pull off! This design works up fast and gives a lot of room for experimenting with colors and details. Little collar is a cute addition to this project, but feel free to modify it to your needs – although crab stitch is useful to learn!
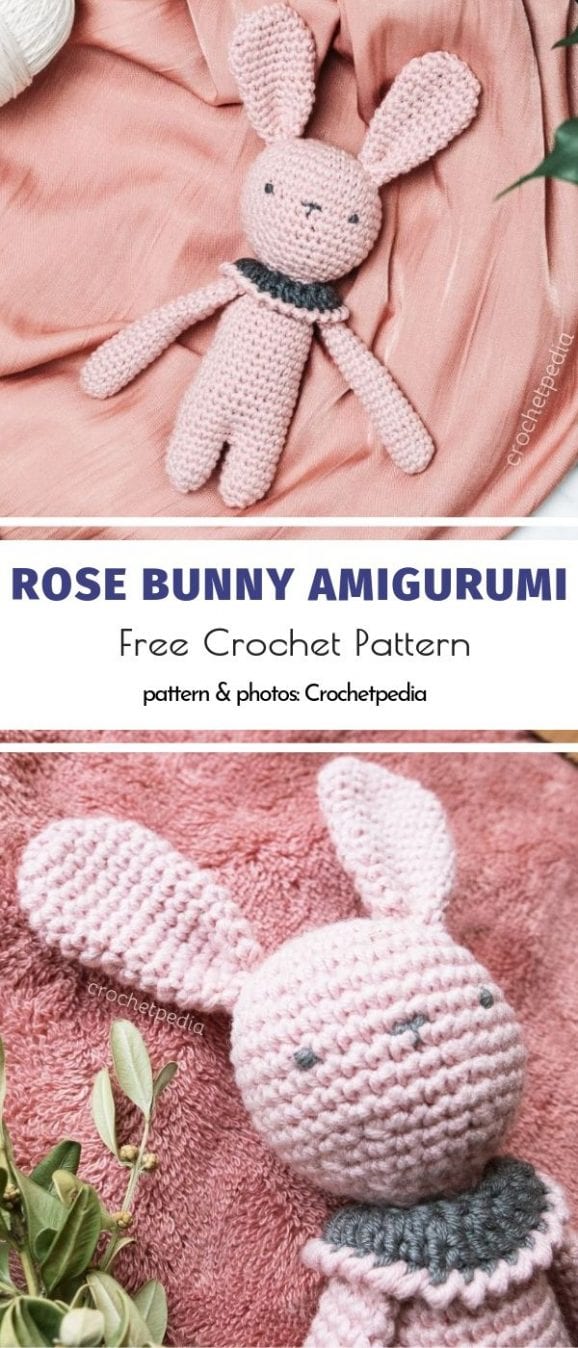
Let’s make it! Rose Bunny is circa 14 cm (5,5″) tall without ears and 19 cm (7,5″) with ears pointing up. You can sew the ears in any direction, however you like.
This is a beginner level pattern, written in Standard US Terms.
TECHNIQUES
- magic ring
- chain (ch)
- single crochet (sc)
- double crochet (dc)
- slip stitch (sl st)
- increase (2 sc in same st = 1 inc)
- decrease (sc2tog = 1 dec)
- crab stitch
MATERIALS AND TOOLS
- yarn: Gazzal Baby Cotton in 2 colors: pink and dark grey
- crochet hook 2,5 mm
- wool needle for sewing parts of the toy together, regular needle for embroidery, stitch marker, scissors

- the body of the bunny is made with single crochet stitches only, except for the collar, in which we use double crochet.
- I recommend you first making all the elements, and then assembling the toy.
- numbers in the brackets indicate the overall number of single crochets in each row.

HEAD
Made with single crochet stitches, spirally.
START: make a magic ring
ROUND 1: 8 sc in the middle of the magic ring, close with a sl st. (8)
ROUND 2: 1 inc in each stitch (16)
ROUND 3: *1 inc, 1 sc* x8 (24)
ROUND 4 *1 inc, 2 sc* x8 (32)
ROUND 5: *1 inc, 3 sc* x8 (40)
ROUNDS 6-9: 1 sc in each st (40)
ROUND 10: *8 sc, 1 dec* x4 (36)
ROUND 11: 1 sc in each st (36)
ROUND 12: *6 sc, 1 dec* x4 (32)
ROUND 13: *5 sc, 1 dec* x4 (28)
ROUND 14: 1 sc in each st (28)
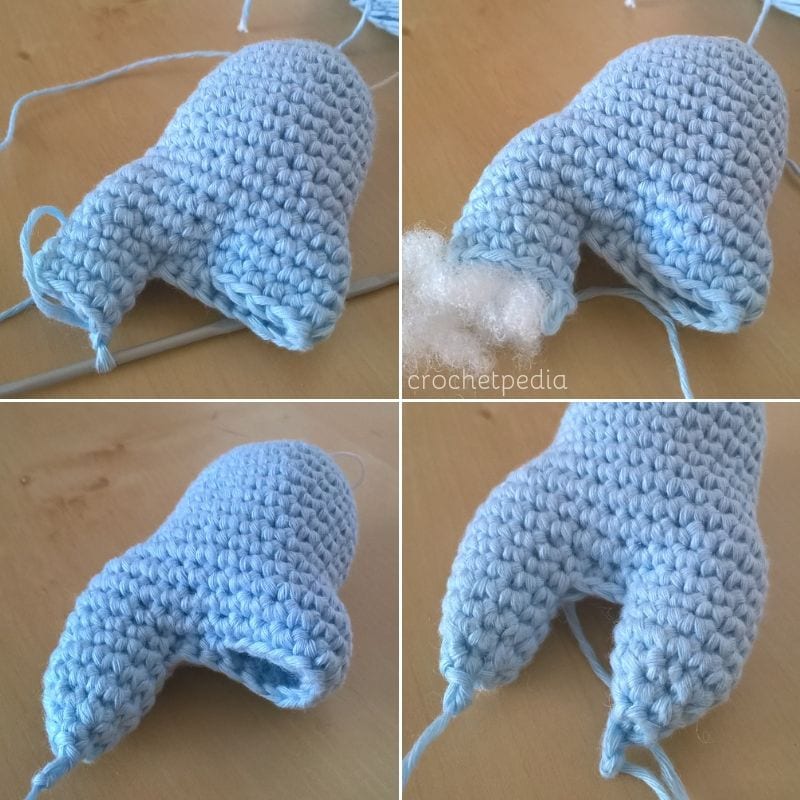
At this stage it is good to fill the head with filler.
ROUND 15 and further: *3 sc, 1 dec* – repeat spirally until you close the hole. Fasten off.
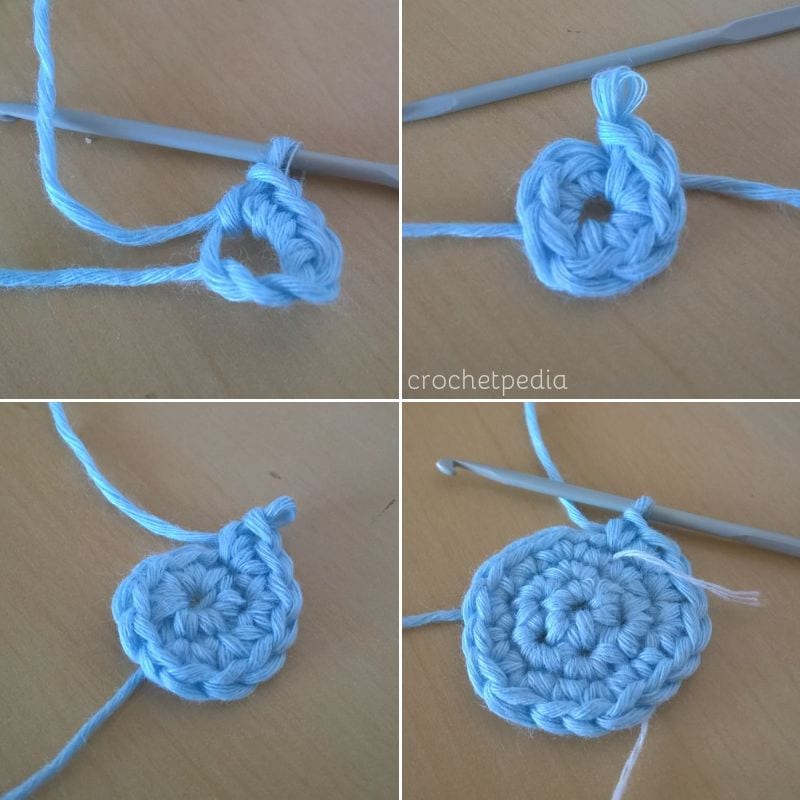 magic ring and first rows of spiral stitches.
 head worked up to create a ball – filled and closed.
Great! You have the head ready. Be sure to fill it well, so it will keep its shape.
Let’s make the body of our Rose Bunny!
BODY
Made with single crochet stitches, spirally.
START: make a magic ring
ROUND 1: 6 sc in the middle of the magic ring, close with a sl st. (6)
ROUND 2: 1 inc in each stitch (12)
Mark the start of the row with stitch marker, it will be easier to count stitches this way.
ROUND 3: *1 inc, 1 sc* x6 (18)
ROUND 4 *1 inc, 2 sc* x6 (24)
ROUND 5-11: 1 sc in each stitch (24)
ROUND 12: 1 inc, 11 sc, 1 inc, 11 sc (26)
ROUND 13: 1 inc, 13 sc, 1 inc, 13 sc (30)
ROUNDS 14-16: 1 sc in each stitch (30)
At this point you can partly put in filling. Now we have to close the body at the bottom, leaving two openings (each with 12 stitches), which will become legs.
ROUND 17: 6 sc, 3 sc together with 3 stitches from the other side (bottom right photo)

making the body, filling it and closing at the bottom to create two holes for legs.
We have closed the bottom of the body now and can start to work on the first leg. We have 12 stitches now on each side, which are worked separately to create legs. Let’s make the first leg! Work next rounds around one of the holes of 12 stitches.
ROUNDS 18-20: 1 sc in each stitch (12)
Add more filling through the leg.
ROUNDS 21 and further: *1 dec, 1sc* until we close the leg. Fasten off, cut the yarn.
SECOND LEG: to make the second leg, you need to attach the yarn once more near the second hole and repeat rows 18-22.
making and filling legs.
Well done! You now have the head and the body. Now it’s time to make arms.

ARMS
Make 2 identical elements, still using only single crochets and working spirally.
START: make a magic loop
ROUND 1: 8 sc in the loop, close with a slip stitch
ROUND 2: 1 inc, 3 sc, 1 inc, 2 sc, 1 inc (11)
ROUNDS 3-12: 1 sc in each stitch (11)
we should add a little bit of filling at this stage.
ROUND 14: 1 dec, 10 sc (10)
ROUNDS 15-20: 1 sc in each stitch (10)
ROUND 21: 1 dec, 9 sc (9)
ROUND 22-23: 1 sc in each stitch (9)
ROUND 24: 1 dec, 8 sc (8)
FASTEN OFF.
 making arms – start with magic ring and go!
The arm should have flat end and should be filled only in the bottom part. This way it will have nice visual “weight” to it, and it will be easy to sew to the body.
Don’t forget to make another one!
EARS
Make 2 identical elements, still working with single crochets only, spirally, with pink yarn. You do not fill the ears with filling!
START: make 5 chain stitches
ROUND 1: 5 sc in each stitch, then turn the piece around and make another 5 sc in the same stitches, but from the other side (10)
Note: now we will continue to add and subtract the stitches from the sides only.
ROUND 2: 1 inc, 4 sc, 1 inc, 4 sc (12)
ROUND 3: 2 inc, 5 sc, 2 inc, 5 sc (16)
ROUNDS 4-5: 1 sc in each stitch (16)
ROUND 6: 1 dec, 6 sc, 1 dec, 6 sc (14)
ROUNDS 7-9: 1 sc in each stitch (14)
ROUND 10: 1 dec, 5 sc, 1 dec, 5 sc (12)
ROUND 11: 1 dec, 4 sc, 1 dec, 4 sc (10)
ROUNDS 12-14: 1 sc in each stitch (10)
FASTEN OFF.
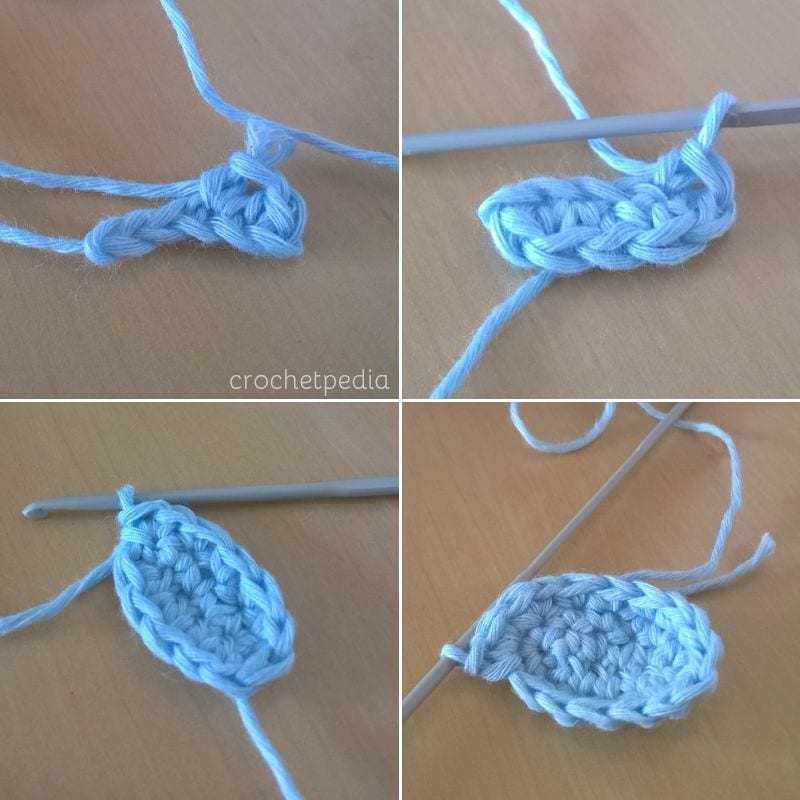
start of the ear – row of chains is worked from both sides, then continued spirally.

ears in the making and ready.
Great! Ears are ready. Of course, if you are feeling playful, you can try making the ears longer, shorter or more pointy – however you like it!
Now to the last part – the collar.
COLLAR
Start with dark grey yarn.
START: make 12 chain stitches
ROW 1: 1 sc in each stitch
ROW 2: turn the work around, 3 chain, 2 dc in each stitch (24)
Secure the stitch and cut the yarn. Now add pink yarn and finish the edge using crab stitch. You can learn how to make it here -> CRAB STITCH.
Sew the ears to the head in whatever position you like, bending them slightly at the base. Attach head and arms to the body, quite closely together. The arms should have nice shape – filled at the bottom and flat near the top.
Hide the loose threads, put on the collar and close it at the back. You can attach it to the toy so it stays flat and nice. The last step is to add simple embroidery on the head. Try not to use plastic safety eyes, especially if you want to give this toy to a small baby, because they can be pulled off or chewed off.

Great work! Now you have your bunny.