
In this article:

This post contains affiliate links.
If you’ve never completed tapestry crochet before it can look difficult and confusing. In reality though, once you have learned and practiced a few core rules, tapestry crochet can be fun to make. You will be able to complete hundreds of amazingly detailed designs that you never thought were possible, so try it today!
Tapestry crochet can create both simple and intricate designs, because the process is the same. You can create shapes, patterns, images, and even text using tapestry crochet, which can sound mind-blowing if you are just starting out. Use a chart or work alongside written instructions, and once you know how to create tapestry crochet you will take your crafting to the next level.
You may also like:
Find the best selection of quality yarns for crochet in Katia’s online store.
In this article we’ll explore the various ways you can create tapestry crochet in, as well as what stitches you should use, how to read charts and crochet in the round.
What is tapestry crochet?
Tapestry crochet is a type of colorwork that involves working with at least two colors at the same time. You crochet with one color (which is called the active color) whilst holding the other color flat along the top of your work ready to use (the inactive color). The inactive color is the one you are not using to create crochet stitches. The roles of the active and inactive colors change throughout the project depending on which color you actually use to create the stitches.
Various types of tapestry crochet
Tapestry crochet can be worked in both flat rows and in the round.
Example of overlay tapestry crochet. Photo from havencrochetdesigns.com.
Flat tapestry crochet
Flat tapestry can be made using two different techniques:
One-directional flat tapestry crochet
This method is similar to mosaic crochet and is worked in flat rows only on the right side of the work. This means that yarns are cut at the end of each row and you do not turn your work. There can be a lot of ends to weave in using this method unless you can hide them in your work or use them as decorative fringes.
Example of overlay tapestry crochet. Photo from havencrochetdesigns.com.
Two-directional flat tapestry crochet
This method involves turning your work at the end of each row, so you need to decide which is the right and wrong side of your work. The right side is usually odd-numbered rows, when following a chart the right side details are read from right to left. On the wrong side, the even rows are read left to right. Remember to always carry your inactive yarn on the wrong side of your work when using this method.
Tapestry crochet in the round
Tapestry crochet can also be worked in the round. When working in the round you are always working on the right side of the fabric and usually create a continuous spiral, flat disc, or a tube. This method is usually used by beginners as it is easier to keep track of your pattern.
Stitches used in tapestry crochet
The most popular stitch to use during tapestry crochet is the single crochet as it is the smallest stitch and provides a tightly enclosed area for the inactive yarn. There are a few variations on how the single crochet stitch is used.
Regular single crochet
This is the basic single crochet stitch and the hook is inserted into both loops when creating a stitch. This stitch creates a denser fabric that leans either to the right or left depending on your dominant crochet hand and has shorter stitches. This stitch is popular when creating two-directional flat tapestry crochet.

photo from lookatwhatimade.net.
Single crochet back loop only
When creating this stitch the hook is inserted into the back loop of the stitch only. This stitch creates a decorative ridge on your work, creates a more symmetrical finish, and creates ‘higher’ looking stitches. This stitch is popular when creating tapestry crochet in the round and one-directional flat tapestry crochet.
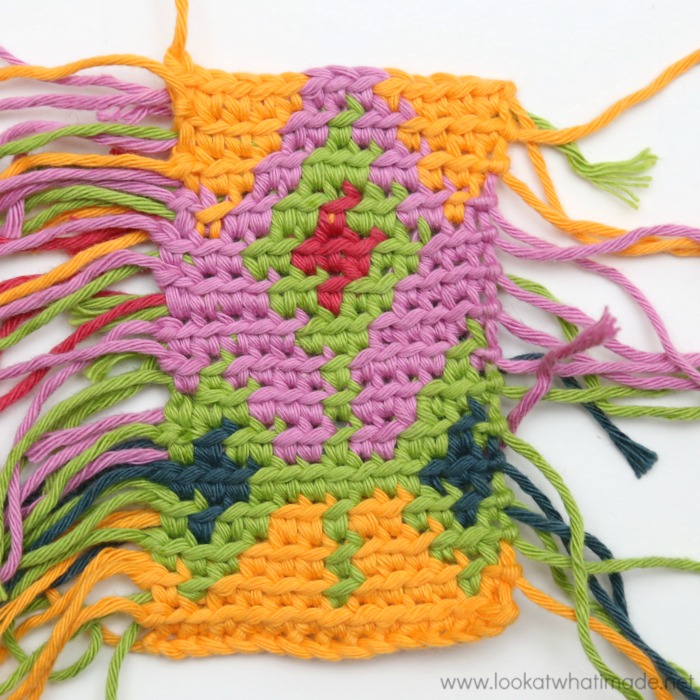
photo from lookatwhatimade.net.
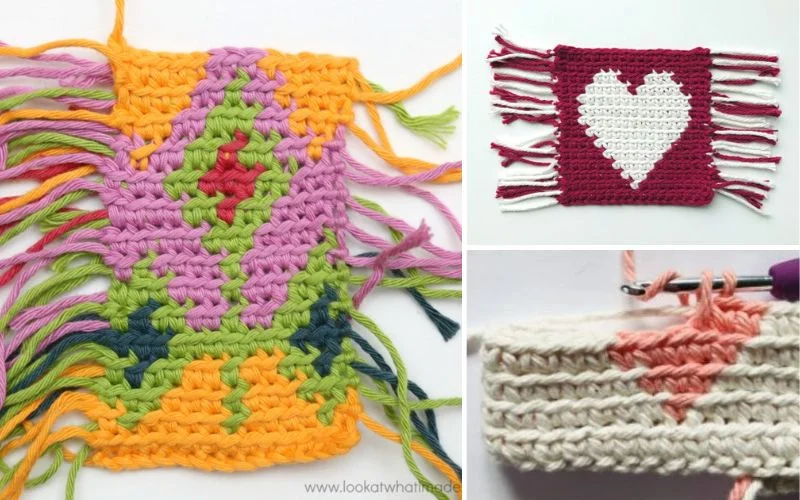
Comparing these two methods
Here you can see both methods side by side.
Looking at the green diamonds you can see that the color change on one side of each diamond is neater than on the other. When working through both loops, this is left-leaning and when you are working through the back loop only, this will be right-leaning. Each method leaves small green blips on the other side, indicated by the arrows.
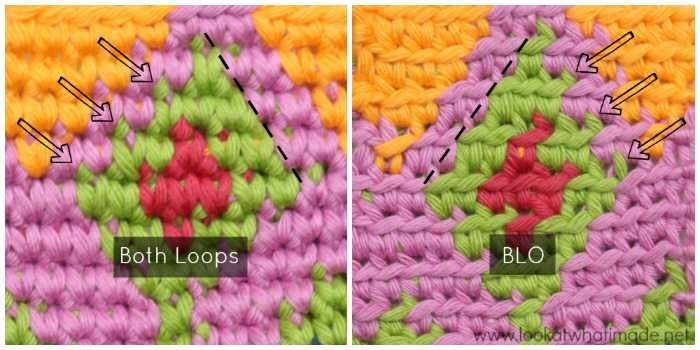
photo from lookatwhatimade.net.
Modified single crochet
You can also choose to use the modified single crochet stitch which is similar to a single crochet back loop only, but instead of creating a yarn over to close the stitch, we create a yarn under. This creates a smaller, tighter stitch. This stitch is popular when working with multiple colors in the round.
Comparison of a yarn over and yarn under. Photo from havencrochetdesigns.com.
How to read tapestry crochet graphs
Tapestry crochet patterns tend to include both written instructions and charts. The written instructions help you shape your project if there are increases and decreases in the pattern. The chart helps to explain the tapestry pattern and which colors to use.
Tapestry charts are more popular as you can instantly see how your work should look. They are usually in a grid format where one square equals one color and stitch.
To read a tapestry crochet chart you start at the bottom right-hand corner and work your way upwards.
When working in the round or creating one-directional flat tapestry crochet, always read the grid from right to left.
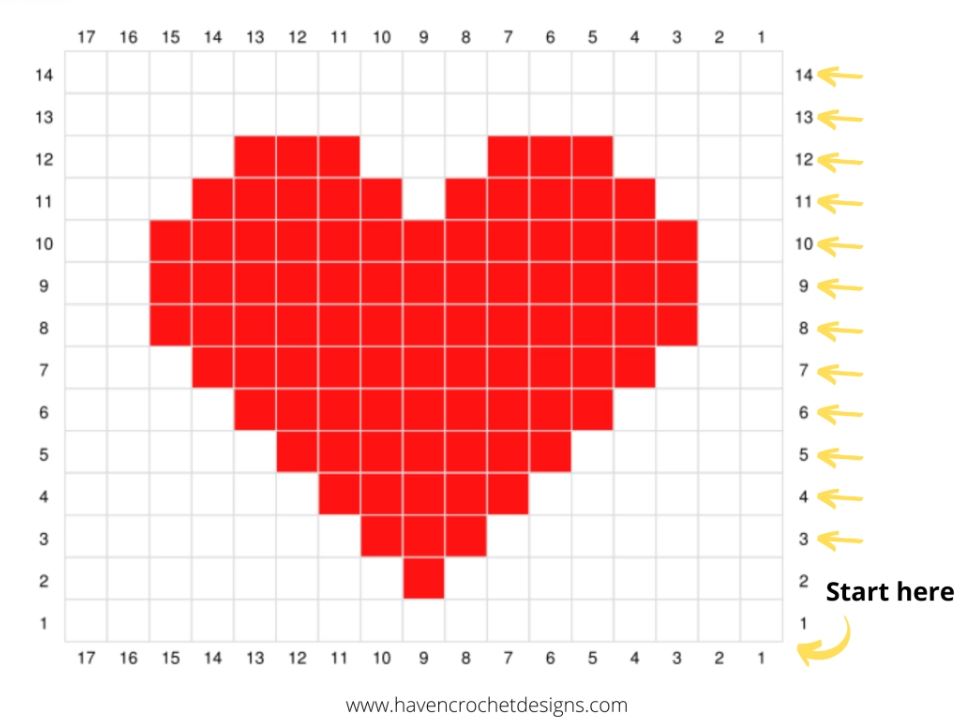
photo from havencrochetdesigns.com.
If you are creating two-directional flat tapestry crochet, read your right side rows from right to left and wrong side rows from left to right.
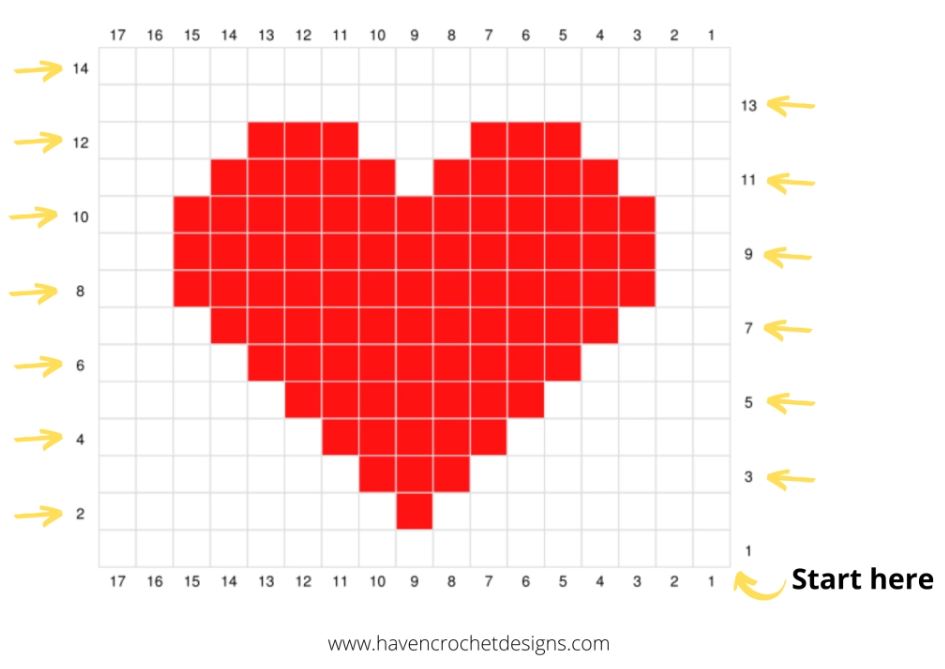
photo from havencrochetdesigns.com.
There are also tapestry crochet charts for working a flat circular pattern, these charts are circular and start from the middle and work outwards.
Charts can be quite simple or detailed, they can show you pattern repeats and indicate which color you should be working on for that part of the pattern.
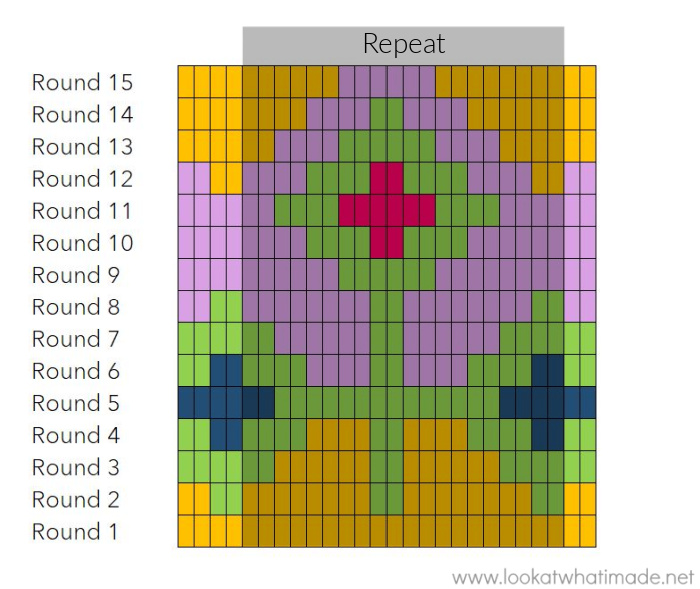
photo from lookatwhatimade.net.
How to change colors in tapestry crochet
There can be lots of color changes when creating tapestry crochet depending on the complexity of your pattern.
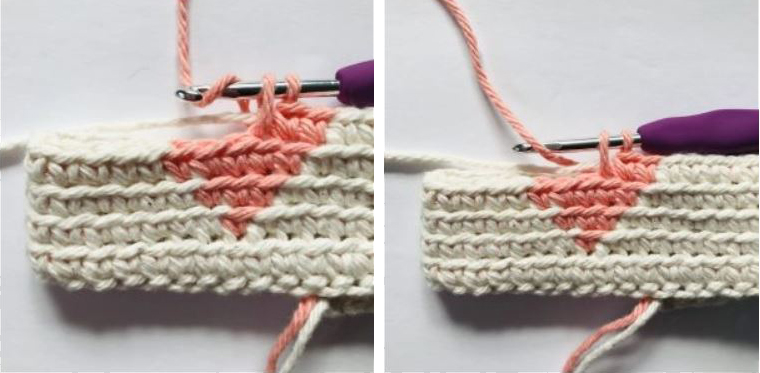
To change colors use the image below as an example. On row 3 we would change colors at both points indicated by the stars.
- You would work 6 single crochet stitches with white yarn, the active color.
- To change color for the 7th stitch you would work the last single crochet but stop before the last yarn over.
- Then you would bring the active color forward so it is laying on the front of your work
- Finish the 7th stitch by creating a yarn under with the red yarn, the inactive yarn, and pull it through both loops on the hook.
- This now makes the red yarn the active color and the white yarn the inactive color.
- Repeat this process to create further color changes.
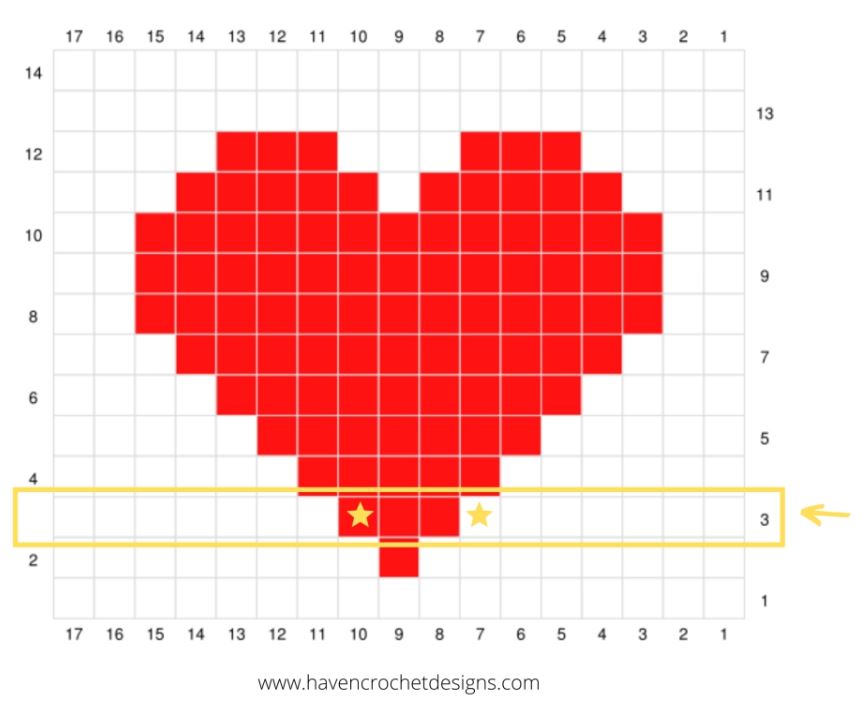
photo from havencrochetdesigns.com.
How to start and end each round
Starting each round
Make sure the loop on your hook is the same color as the first stitch of the new round. Start each round with a chain one to give you some room, this stitch does not count as a stitch.
Ending each round
Each round is finished using a slip stitch. Before completing the last stitch check which color is used for the first stitch in the next round.
- If it is the same color continue your crochet as normal
- If it is a different color, insert your hook into both loops of the first single crochet and yarn over with the new color. Pull through both loops creating your slip stitch in the new color.
Tips and tricks for tapestry crochet
Follow the advice below to help improve your tapestry crochet skills.
- Minimize the inactive color showing in your work by
- Give the inactive yarn a gentle pull every few stitches so it doesn’t bulge and stick out.
- Try using a smaller hook, this creates tighter stitches so you minimize the inactive color showing.
- Choose your colors carefully. If your colors have a really high contrast there is more chance it will show through a lighter color used.
- Maintain an even tension by always working with the number of colors in your project, even for rows that only use one color.
- Avoid creating a big tangled mess by untangling the yarn every few rows.
- Make sure you crochet over the inactive yarn with every stitch otherwise you will create floats and loops on the wrong side of your work
- When working in rows, decide which is the right and wrong side of your work. Your pattern is reversible but it is helpful to know where to start each row. When starting a row on the wrong side, hold the inactive color in front of your work. And when starting a row on the right side – hold the inactive color behind your work. The wrong side will show a slight color blip but the right side will look perfect.

photos from lillabjorncrochet.com.
We would love to see the wonderful items you make with your new skills, so share your work in our Facebook group!