
In this article:

This post contains affiliate links.
Who doesn’t like to find a crochet hack or trick to make their lives easier? When it comes to our hobbies, we take part in them to relax and have fun, escape the stresses of everyday life. So, to sit down and find some aspect of what we love to do difficult or annoying can sometimes take the motivation out of completing a project or crocheting as often as you wanted to.
We have compiled the top 5 crochet hacks to help make crocheting easier and more enjoyable. These hacks will enable you to create your projects faster and with a more seamless and professional finish.
1. Soften scratchy yarn
Everyone has cheap, acrylic yarn in their stash and while it is great for tackling big projects such as blankes it can be scratchy on your hands whilst crocheting. Feeling a friction burn while you’re trying to finish part of your project can sometimes dampen your will to continue. Not to mention having rough skin or calluses on your fingers is not ideal.
Find the best selection of quality yarns for crochet in Katia’s online store.
But you don’t have to stop crocheting with more cost-effective yarn as there is a way to help soften yarn to make it more pleasurable to work with.
Please note: Don’t use this method on yarn that needs to be hand-washed, so please don’t throw the precious skeins in the washer. But this method is great for acrylic shop-bought yarn.
- Make sure to always read the yarn label before starting.
- Remove the paper yarn label
- Fluff up your yarn but make sure it doesn’t unwind
- Put your yarn in a net laundry bag or sock to keep it from getting tangled in the washing machine
- Add your yarn to the washer and set to a gentle wash
- Add plenty of fabric softener
- Tumble dry on a medium heat
These simple steps will make a massive difference to that scratchy yarn you’ve wanted to use but can’t stand to touch.
2. Join a new yarn securely and make it invisible
There are a few different ways you can join a new yarn during crochet but the magic knot is definitely a great choice and why it has made it onto our list. This knot is not only really strong it also stops the need for weaving in any ends. We know it sounds too good to be true but with a little bit of practice, you will never use a different method for joining yarns again.
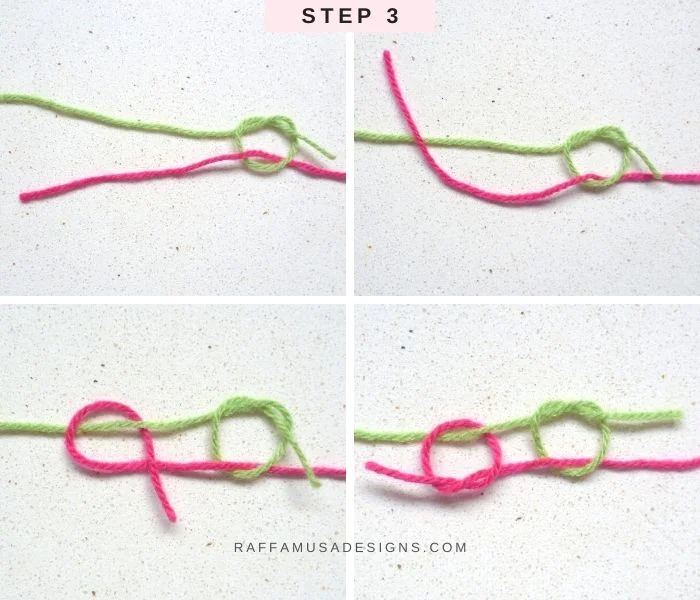
photo from raffamusadesigns.com
How to create a magic knot
- Lay both your yarns horizontal and parallel on a flat surface.
- Make sure one yarn end runs in one direction and the other yarn runs in the other direction
- With the yarn you are already using tie a simple knot around the yarn you want to join to your work
- Now with your joining yarn tie a simple knot around the yarn you are already working with.
- Pull both knots really tight
- Now hold each yarn and pull so the knots begin to slide towards each other.
- Pull as tight as you can to secure the magic knot
- Cut the yarn tails as close as you can to the knots.
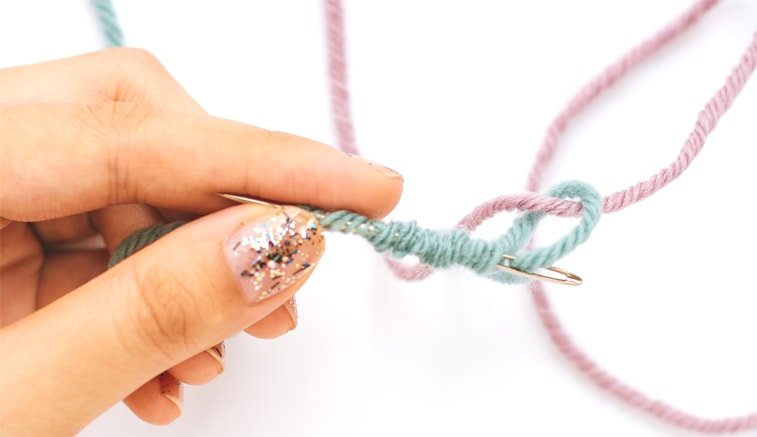
Another great invisible joining method is the Russian join. It uses a similar technique to the magic knot but instead of using knots, you hide the yarn inside itself on either side. If you’ve never heard of this technique just reading that will be mind-blowing. Check out this image from sheepandstitch.com to gain more of an idea of how it works.
3. Keep your edges straight with this cool trick
There are several opinions on how best to keep your edges straight whilst crocheting, the most popular being skipping turning chains or using modified double crochet stitches. Whilst these techniques are perfectly adequate ways to edge your crochet the best solution, we’ve found to keep your edges straight while you are crocheting is to use stacked single crochet stitches.

photo from sewrella.com
This technique is versatile and can be used to edge multiple different crochet stitches including double crochet, half-double crochet, and treble crochet.
To create stacked single crochets:
- Instead of creating a turning stitch (how many chain stitches will depend on your pattern) create a single crochet in the first stitch of the last row.
- Next, create another single crochet by inserting your hook into the sidebar of the single crochet you just made.
- Create a yarn over and then pull the loop through
- Create another yarn over and pull through both loops.
You have now created two stacked crochet stitches. Carry on crocheting.
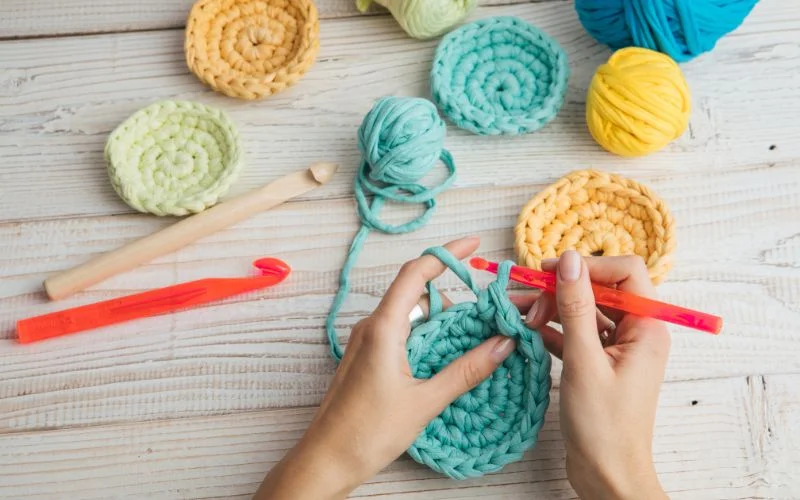
4. Learn the magic circle
Learning how to create a magic circle is a definite must for anyone who regularly works in the round or is thinking of creating amigurumi projects. The magic circle starts with an adjustable loop that enables you to tighten or loosen the stitches on the first row so that a circle is formed with no gap in the middle.
Crocheting the perfect magic circle can take a bit of practice but once you have mastered this hack your projects will look more professional and well finished.
Whilst traditional techniques, for example when creating granny squares join the first round using a slip stitch the magic circle enables more movement in the first round so you can create the perfect circle center.
To create a magic loop
- Loop your yarn twice around your fingers. Make sure your yarn tail lays to the left of your loops and your yarn ball is to the right.
- Insert your hook under both pieces of yarn. Hook the first piece of yarn (This should come from your yarn ball)
- Pull this yarn under the other yarn, creating a loop on your hook (Do not count this as your first stitch)
Now create the number of chain stitches required by your pattern. - Next, pull each end of the yarn to create your circle. Hold your working yarn still while pulling the yarn tail gently.
- Now you have a tight, neat circle slip stitch into the first stitch to secure your first round of stitches.
5. You don’t always need to buy more yarn
We get it, we really do. You find the perfect pattern and want to get started straight away but you can’t find the right weight yarn in your stash. But before heading to the shops to part with your well-earned cash check out this alternative. It can also be a great stash-busting opportunity if yours is getting out of hand.
The image below shows how you can create different yarn weights by doubling up the yarn weight below it. For example, if you need worsted weight yarn but all you have is Aran. Use 2 strands of Aran yarn to achieve the desired weight.
Just make sure you remember that you will need double the amount of yarn so that you don’t run out halfway through your project but it can be a good chance to get creative with your colors. Who said you need to use 2 strands of yarn that are the same color? Experiment and create some amazingly unique products.
Pairing a color with white is also a great idea and produces a beautiful marled effect.
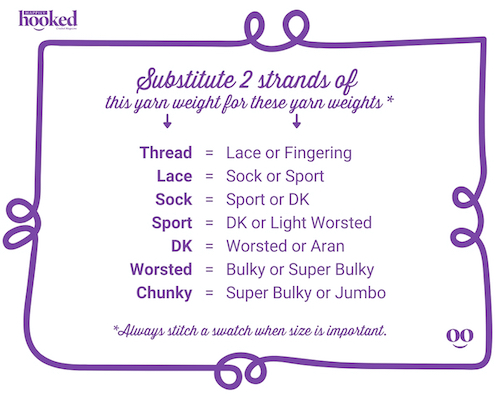
photo from happilyhooked.com
One extra crochet hack we thought deserved a mention…
We know, we said the top 5 crochet hacks but we couldn’t leave out another hack that will help make your crocheting easier.
Two words: Foundationless crochet.
Some projects have hundreds of starting chains, it’s easy to lose count and have to restart multiple times. With foundationless crochet stops this frustration by allowing you to start crocheting stitches without creating the foundation chain. You can add as many stitches as you need and the starting chain is incorporated into the first row of stitches.
This is an advanced technique and may take some practice to get correct. The beauty of creating foundationless crochet is the neat starting edge it creates. The ‘V’ stitch shapes it created along the bottom edge are great if you want to crochet a border on a blanket as they look and act the same as any other crochet stitch, unlike a traditional starting row where the stitches and be uneven in look and tension.
We hope you found our crochet hacks useful and can apply the techniques to your crochet, making the craft easier and more enjoyable. From softening your yarn stash to creating invisible joins there are many ways to improve your crochet skills. And make your projects look professional, well finished, and saving you time in the process.
🤍
We would love to see the wonderful items you make with your new skills, so share your work in our Facebook group!
For more free designs every day follow us on Facebook.