
In this article:

This post contains affiliate links.
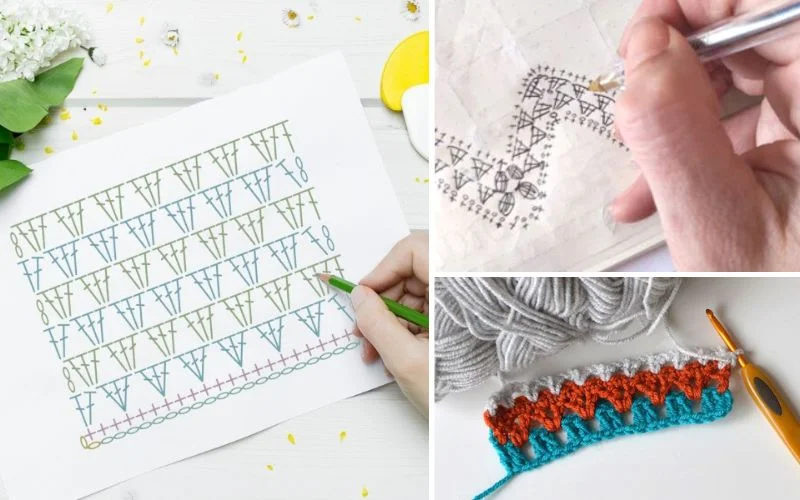
So, you’ve been crocheting for a while, but you keep coming across these diagrams containing confusing symbols. Fellow crafters have mentioned that you can crochet from these diagrams, but you just can’t figure out how. Well, you’ve come to the right place, because in this article we are going to decode crochet diagrams. You will learn how to read them and how to write them, so let’s begin!
To work on your project, get the best quality yarns for crochet in Katia’s online store.
You may also like:
Being able to read crochet diagrams will open up a world you haven’t dreamt of. Why? Being able to understand and decipher the symbols on a crochet chart means you can visualize the end project much more clearly. It’s a magical superpower reserved only for crocheters.
What Are Crochet Diagrams?
In crochet diagrams, symbols and lines are used to indicate various crochet elements, such as stitches, chains, and more. They are a visual representation of the stitch or project, making it easier to imagine how it will look like when finished.
Many crocheters prefer this type of instructions over written patterns. The visual aspect helps to understand how the stitches interact with each other in a pattern.
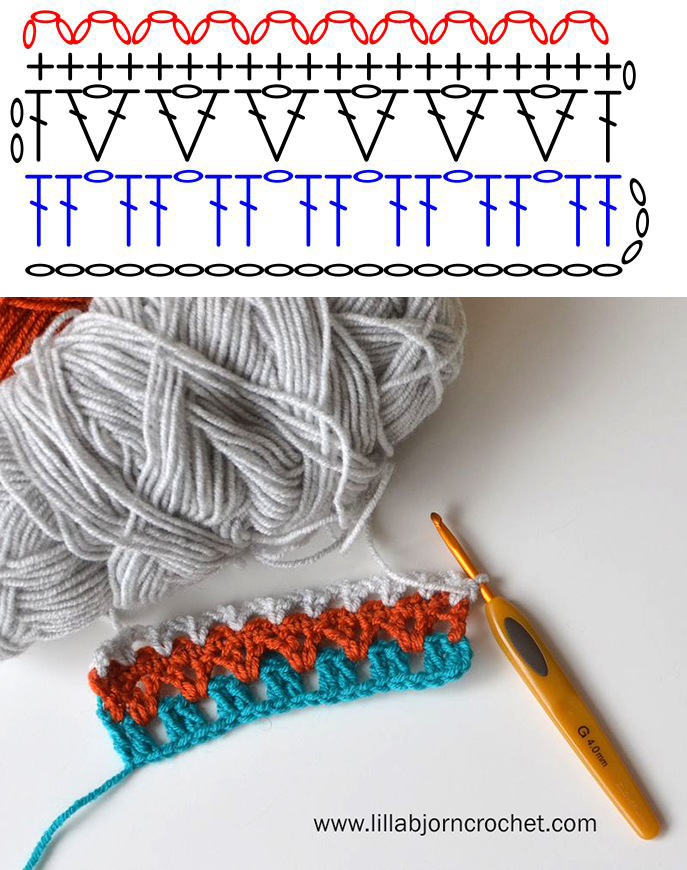
photo from lillabjorncrochet.com
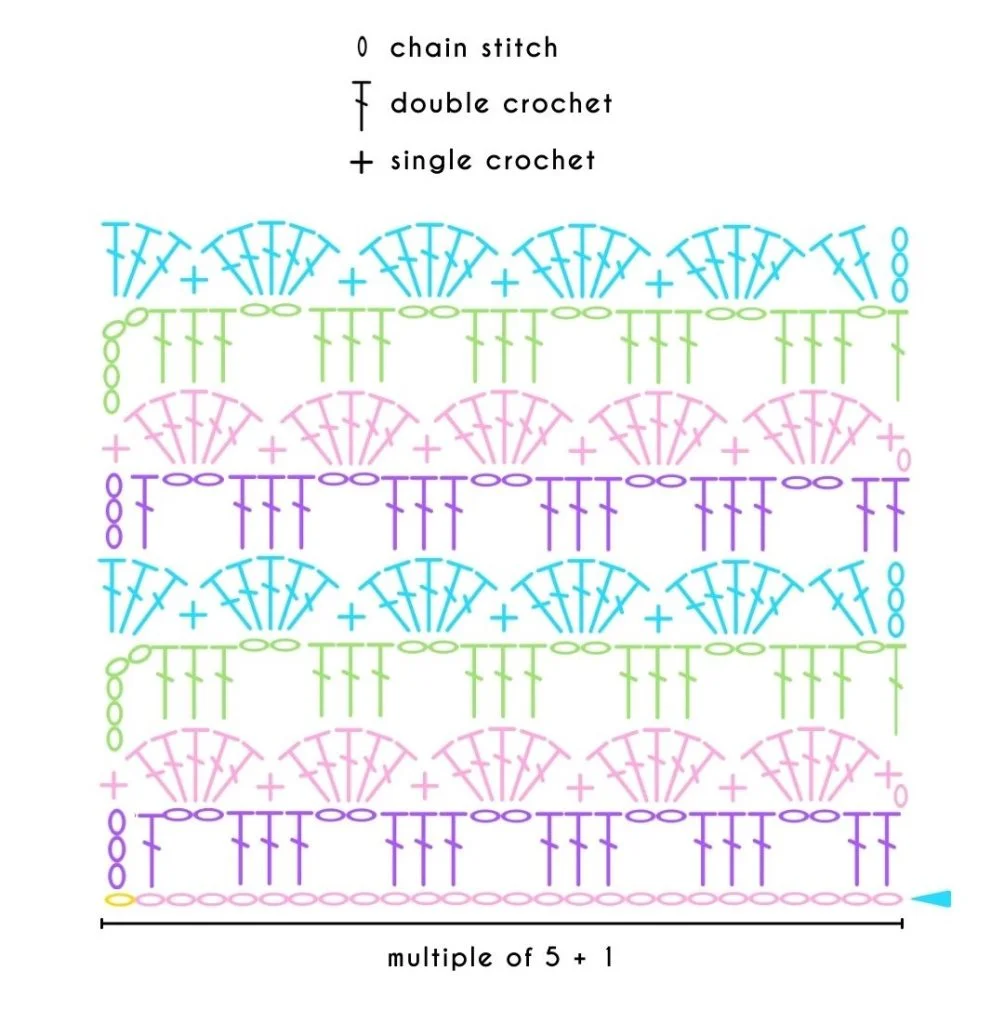
A crochet chart contains symbols that represent the stitches in a crochet pattern, and they come in rows or rounds depending on the project. These symbols are standardized, so once you’ve learned them you should be able to read any crochet pattern that comes with a chart.
These charts are helpful as many crafters are visual learners and can find image-based instructions easier to follow. Having a chart alongside written instructions can help make sense of complicated patterns, so it’s a fantastic aid for all those learning. What’s more, crochet charts do not belong to any language, meaning you can buy and follow patterns from the other side of the world.
Now, let’s learn how to read crochet charts and understand the symbols used.
Basic Stitch Symbols
What does each stitch look like? Let’s look at the most basic crochet stitches.
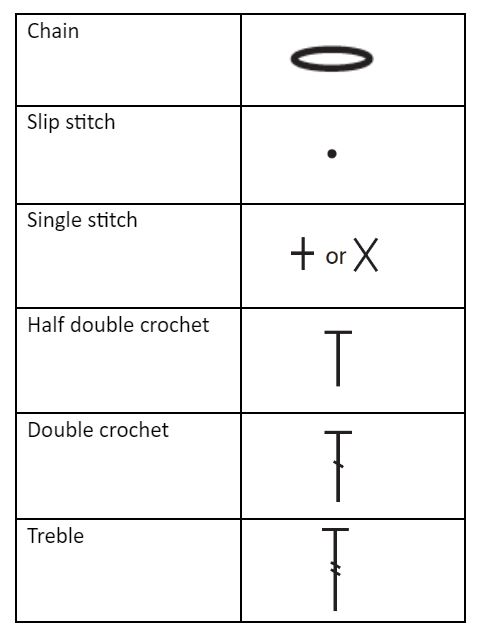
Above you can see the standard basic crochet stitch symbols, so once you learn these it should be quite easy to read crochet charts. There are only two aspects of reading a symbol chart that you need to keep in mind – what the stitch is and where it goes.
Most crochet patterns have a key to explain what each symbol means. Additionally, most of the symbols are basic representations of what the stitch looks like. For example: the chain stitch symbol is an oval as the stitch itself looks like an oval once crocheted. Longer stitches such as half-double and double resemble ‘T’ shape. The small lines through the ‘T’ represent how many yarnovers you need to add to create the different stitches.
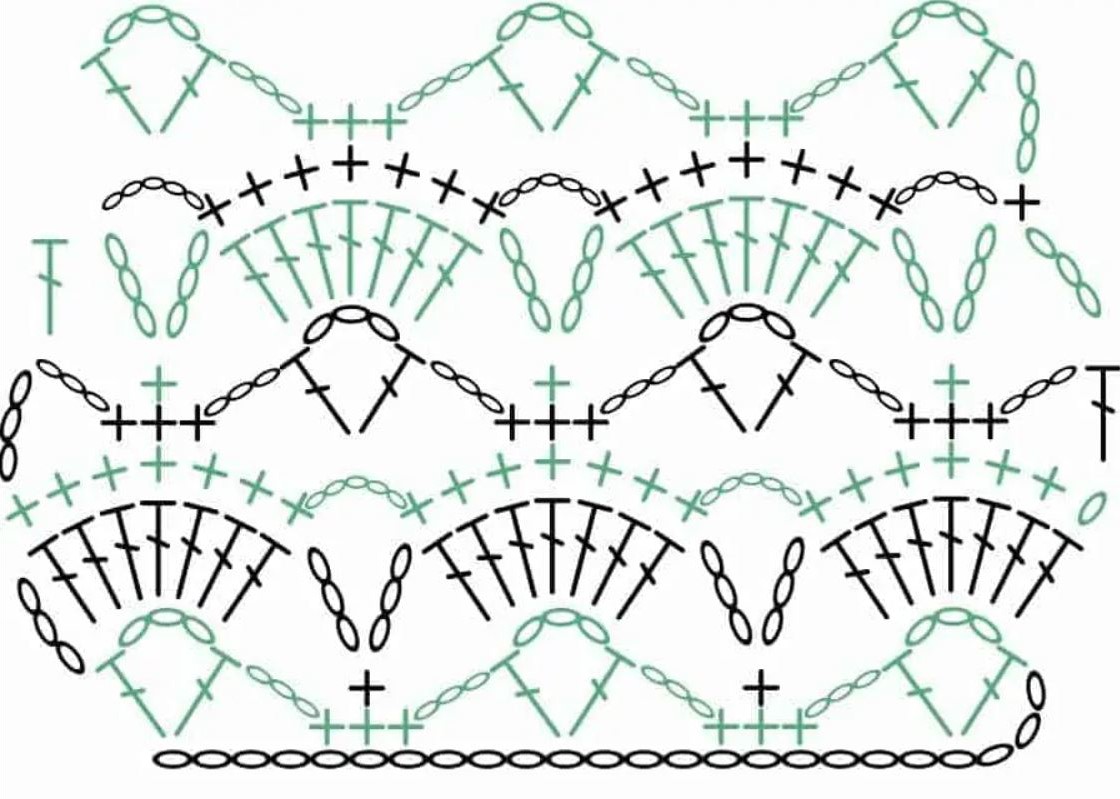
Combined Stitch Symbols
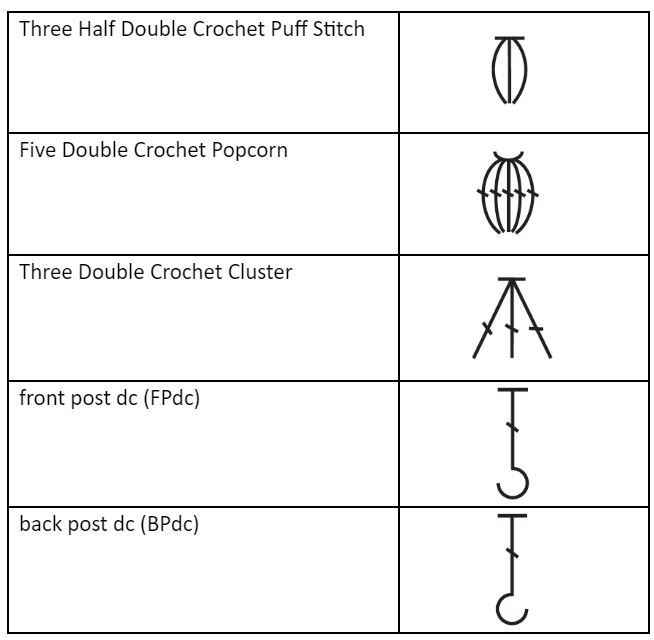
The symbols above represent how crochet stitches look in patterns to create different designs e.g. the popcorn stitch, shell stitches, and granny squares. The two post stitches at the bottom have little hooks, so you know which one is it by the direction in which the hook points.
How to Read Crochet Diagrams – Rows
- Right-to-Left, Bottom-to-Top: In most cases, crochet diagrams are read from right to left, favoring right-handed crocheters. This process mimics the way you crochet in rows.
- Starting Chain: Begin by identifying the starting chain, often marked with the number of chains required.
- Multiplication Guides: Diagrams often show just an element of the bigger pattern. Arrows and numbers below the foundation chain will help you understand how to multiply the repeatable module to achieve the size you want.
- Move Like a Snake: If you follow the first row right to left, the next row should be read from left to right, and so on.
- Look for the Turning Chains: Turning chains show you where the row starts.
- Symbols and Lines: Read the symbols and lines within the diagram carefully. Each symbol corresponds to a specific stitch or action, such as a double crochet, increase or combination of stitches.
- Check the Key: Patterns almost always include a key that explains the meaning of each symbol used in the diagram. Refer to the key if you encounter unfamiliar symbols.
How to Read Crochet Diagrams – Rounds
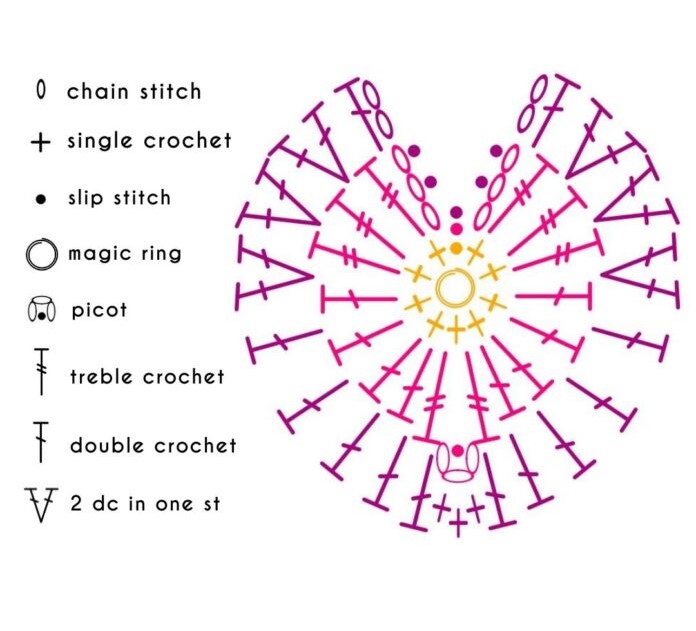
- From the Center Out: Diagrams of circular motifs start in the center with a magic ring or a chain loop.
- Go in Rounds: Each round either ends with a slip stitch (marked by a dot) or continues spirally. The latter should be marked with another color or otherwise, to make reading the diagram easier.
- Pay Attention to the Placement: The position of the symbol tells you where you should work the stitch. If possible, consult the written pattern if any part of the diagram is unclear.
Where Should You Place the Stitches?
We usually work crochet charts in rows or rounds just like when following a written pattern. When working in rows the pattern usually starts at the bottom and works up towards the top. When working in the round the pattern will start in the middle and work outwards, as well as following a counter-clockwise direction.
We work the pattern from one stitch to the next and each symbol indicates what stitch is next and where it should be placed. For example, to create a shell stitch you will see 5 vertical lines coming out of 1 stitch on the previous row, so you should place all the next 5 stitches in this stitch.
Generally, we should work stitches through both loops, but sometimes a pattern may call for a back loop or front loop only. This will be indicated on the pattern usually by a short semi-circle that is facing up (front loop) or down (back loop). This symbol usually sits above or below a symbol, so it is clear which stitch is referring to.
Extra Tips for Reading Crochet Charts
- Double-check the symbol key before starting to crochet, don’t assume that the pattern uses standard symbols. It is also a good idea to double-check if your pattern is using US or UK crochet terms as they do differ slightly and may affect your finished project.
- To practice your symbol reading skills, use a pattern that has accompanying written instructions so that you can double-check your work against the written instructions as you go.
- Keep track of where you are in your pattern by marking off rows and stitches as you go. Stitch markers within your work can also help stop you from getting lost while you’re busy working away.
- Practice reading charts aloud to reinforce what you are doing, such as counting 5 chain stitches in your pattern and then saying ‘chain 5’ out loud.
How to Write Your Own Crochet Chart
Now that you know how to read a crochet chart, are there ways you can write your own pattern using a chart? The short answer is yes! Using pencil and paper, you are able to draw out your ideas with no limits.
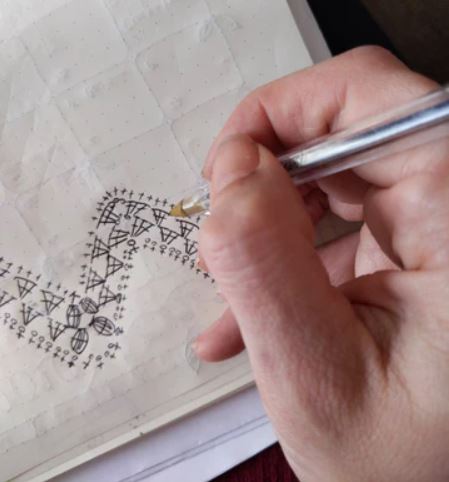
photo from thecrochetproject.com
However, if you want to create a more professional and polished crochet chart it is a bit more complicated. Unlike knitting which has a selection of brilliant software tools to help create patterns, crochet has only one designated software, called Stitchworks. Unfortunately, many crocheters have professed to struggling with when creating crochet charts, so it’s not the best.
Crochet is extremely versatile and features a myriad of stitches, so it’s hard to create a software that suits everyone. You can insert your hook pretty much anywhere within your work, which is hard to translate into software.
That said Stitchworks is rivaled by no one else on the market, so be sure to try it. You can use it to create simple crochet charts, but remember to save your work regularly, as it may crash.
Another alternative when creating computer-drawn crochet charts is to develop your skills in Adobe Illustrator, but it requires more work. This is a paid-for software and comes with a steep learning curve if you aren’t familiar with vector-type software.
Vectors are images that are made up of lines, dots, and curves and be easily moved around your screen and duplicated easily. That’s why graphic designers and illustrators use Illustrator a lot.
Drawing Your Pattern
When drawing your pattern on the computer bare in mind that you will need to create each symbol at least once and possibly in multiple formats.
For example, if you are drawing a cluster of 3 double crochets, you will need to draw the first stitch (usually at a slant), the middle stitch (usually straight), and the last stitch (usually slanting the opposite way). You would then be able to group these symbols together to copy to other parts of your pattern.
The hardest part of creating a computerized crochet chart is perfecting the spacing between the symbols. It can fast become a nightmare if you’re a perfectionist.
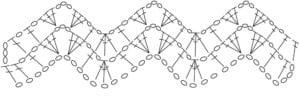
photo from thecrochetcrowd.com
The choice of medium is totally up to you, as well as whether you include diagrams at all! If you plan to sell your crochet pattern, however, it’s good to add a crochet chart as a visual aid.
Now that you know how to read crochet diagrams, the crochet symbols won’t look as daunting as they once did. Try and tackle a simple crochet chart for your next project and start practicing your newfound skills! Once you’ve started using crochet charts you won’t want to return to reading long written instructions ever again.
Be sure to choose the best yarns for your crochet project, because quality is everything!
We would love to see the wonderful items you make with your new skills, so share your work in our Facebook group!
Thank you
Explains it really well
Thank you for this information. I have been crocheting for years and always wondered how to read those charts.