
In this article:

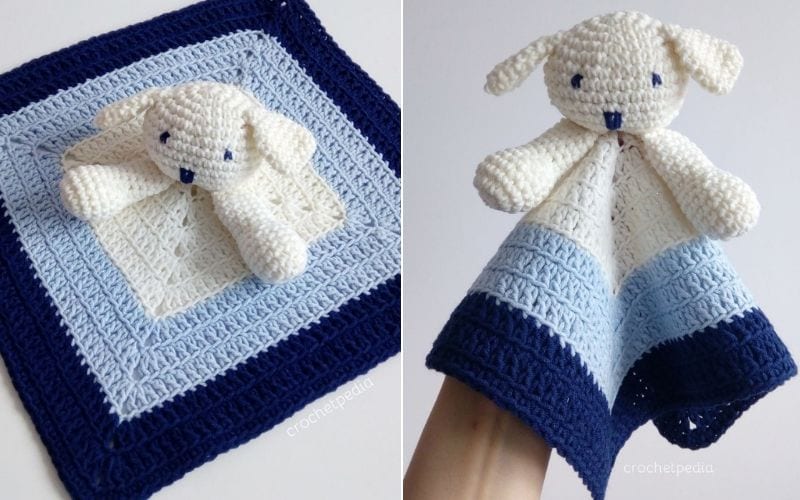
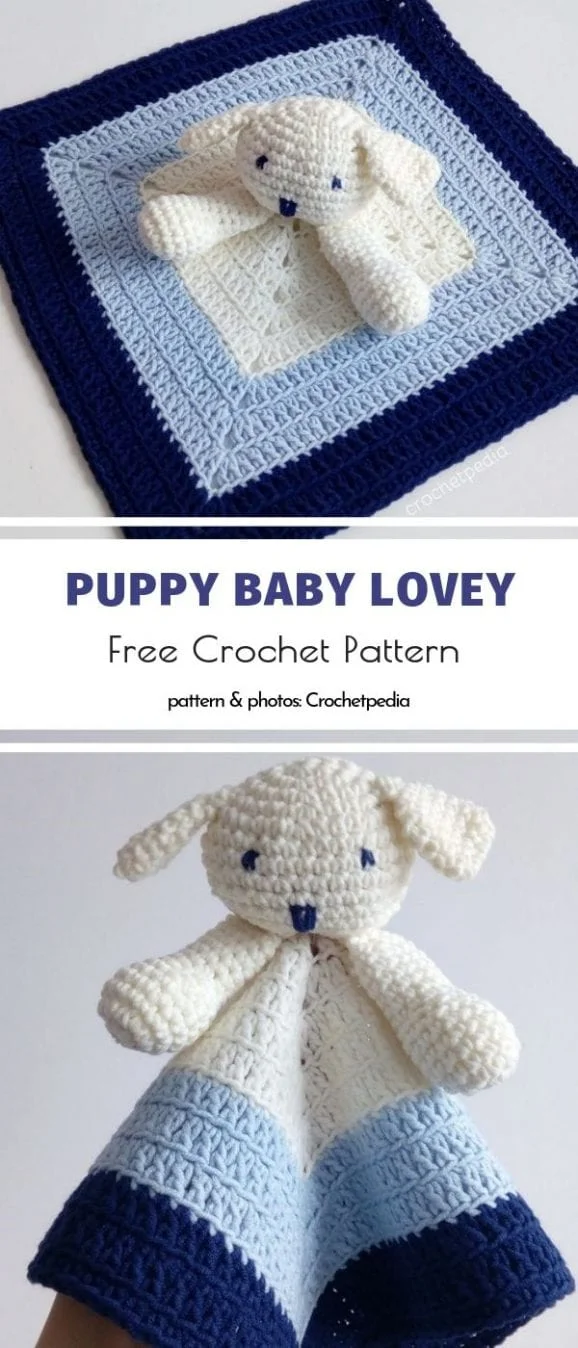
Baby lovey, snuggle blanket, security blanket – this kind of toy has a lot of names. One thing is certain – it’s easy to make and would be a wonderful gift. If you are invited to a baby shower and can’t come up with any ideas about what gift to go for, this may be it! It’s easy to make and works up fast. This project is suitable for beginners, who have never tried amigurumi before, so don’t be afraid and try it! You can use leftover yarn scraps, as this design doesn’t use that much of it.
This project is available on Crochetpedia and Ravelry.
Think about different colors and details you can use here – let your imagination speak! This cute puppy would look lovely in many different color palettes. Make little details like crochet flowers, bows, or else, and add them to this toy!
Remember that weight of your yarn changes the size significantly – the thicker the yarn, the bigger the toy.

This is a beginner level pattern, written in Standard US Terms.
TECHNIQUES used in this project include:
- magic ring
- chain (ch)
- single crochet (sc)
- double crochet (dc)
- slip stitch (sl st)
- back loop only
- 2 single crochets in the same stitch = increase (2 sc in same st = 1 inc)
- single crochet 2 together = decrease (sc2tog = 1 dec)
- basic basic sewing
- embroidery
MATERIALS AND TOOLS recommended for this project:
- yarn: YarnArt Jeans in 3 colors: cream, navy and light blue
- crochet hook 3 mm
- toy filling, wool needle, stitch marker and scissors

BLANKET
REMARKS
- Final size of the blanket is around 10″ x 10″ = 25 cm x 25 cm, depending on the yarn you choose, hook size and your style of crocheting.
- Rounds 4-10 start and end in the same way, the number of double crochets in the middle of the round changes.
- Numbers in parenthesis indicate the final number of dc’s in the entire round.
- 3 chains at the beginning of the round are counted as 1 double crochet (turning chain)
START: Start by making a magic ring.
ROUND 1: 4 sc in the center of the magic circle, close with a slip stitch, tighten.
- Next rounds are done in the back loop only – it means that all double crochets are hooked through the back loop. This simple technique creates nice “line” between the rounds.
ROUND 2: 3 ch (= 1 dc), 1 dc in the nearest st, 2 ch, 3 dc in the 2nd stitch, 2 ch, 3 dc in 3rd stitch, 2 ch, 3 dc in 4th stitch, 2 ch, 1 dc in the first stitch of round 1, close with 1 sl st in the 3rd ch starting the round. (12)
ROUND 3: 1 sl st in the 1st stitch (first dc of the previous round), 3 ch (= 1 dc), 1 dc, 2 ch, *2 dc in same st, 3 dc, 2 dc in same st, 2 ch* repeat * 3 times, 2 dc in same st, 1 dc, 2 dc in same st, close with a slip stitch in the 3rd ch from the beginning of the round. (28)
ROUNDS 4-10: 1 sl st in the first dc of the previous round, 3 ch (= 1 dc), 1 dc, 2 ch, *2 dc in same st, 1 dc in each dc of the previous round, 2 dc in same st, 2 ch* repeat * 3 times, 2 dc in same st, 1 dc in each dc of the previous round, 2 dc in the sl st of the previous round (first stitch of the previous round), close with a sl st in the 3rd ch from the beginning of the round.
ROUND 11: 1 ch, 1 sc in each st of the previous round, close with a sl st. (148)

PUPPY
- if not stated otherwise, rounds are created spirally (do not close with a slip stitch, continue directly to the next round) – (find out more -> crocheting in the round)
- we use only single crochet
HEAD
ROUND 1: 8 sc in the middle of the magic ring, close with a sl st. (8)
ROUND 2: 1 inc in each stitch (16)
ROUND 3: *1 inc, 1 sc* x8 (24),
ROUND 5: *1 inc, 3 sc* x8 (40)
ROUNDS 6-9: 1 sc in each st (40)
ROUND 10: *8 sc, 1 dec* x4 (36)
ROUND 11: 1 sc in each st (36)
ROUND 12: *6 sc, 1 dec* x4 (32)
ROUND 13: *5 sc, 1 dec* x4 (28)
ROUND 14: 1 sc in each st (28)
at this stage it is good to fill the head with filler.
ROUND 15 and further: *3 sc, 1 dec* – repeat spirally until you close the hole

EARS
- make 2 identical elements.
- for an additional effect, you can make each ear using a different color of yarn.
ROUND 1: 1 ch, 6 sc, turn the work around and make another 6 sc in the same stitches from the opposite side. (12)
ROUNDS 2-5: 1 ch, 1 sc in each st of the previous round. (12)
ROUND 6: *4 sc, 1 dec* x2 (10)
Finish by pulling a thread.
- make two identical elements.
ROUND 1: work 8 sc in the middle of the magic ring
ROUND 2: 2 sc in each st of the previous row (16)
ROUNDS 3-5: 1 sc in each st (16)
- At this point you should fill the leg with filling.
ROUND 9-13: 1 sc in each st of the previous round (11)
- Add more filling, fasten off.

Sew ears on after stuffing the head, placing them symmetrically. Use yarn needle for this and for hiding all the threads. In the same way sew paws to the head, and then puppy to the center of the blanket. Hiding yarn ends is important because it can be a choking hazard. For the same reason we don’t recommend using plastic safety eyes. Instead, try basic embroidery.
Happy crocheting!
Can you explain how you did the nose and eyes
Please make your patterns printable.
Very cute although the stitch count on most of this pattern is not accurate.
I agree!! I was so confused regarding the stitch count specifically on the arms. ☹️
Can you explain how you did the nose and eyes
Very cute although the stitch count on most of this pattern is not accurate.
I agree!! I was so confused regarding the stitch count specifically on the arms. ☹️
Please make your patterns printable.
Ears: Can you please clarify Round 1….turn and make 6 sc from the other side = 12 sc. How am I adding these stitches? Despite my experience, I cannot figure this out. Thank you.