![Master Crochet Magic Ring in 5 Minutes [Video for Beginners]](https://yourcrochet.com/wp-content/themes/kadence-child/assets/new/img/page-banner.png)
In this article:

You may have heard the term “magic ring” before, also referred to as a magic loop, a magic circle, or an adjustable ring. A magic ring method is to start crocheting in the round. You will be amazed at both how easy and how useful it is. Learn how to crochet it with this comprehensive guide.
What is a magic ring in crochet?
A magic ring, also called a magic loop or magic circle, is a technique used in crocheting in the round. Thanks to its specific construction, we can tighten the magic ring to close it completely. This way the stitches in the first round are closely packed and there’s no hole in the center.
Why is a magic ring important in crochet projects?
In short, it’s likely the best way of making rounded, tubular, or circular items. We often use this technique for projects like amigurumi, hats, doilies, or granny squares. Of course, you can use other methods to get a circular project going. For example, you can use the chain method, but it’s more difficult and the effects are often underwhelming.
Let’s learn about another common method of starting your crochet project. The slip knot, an initial loop on the hook, allows you to initiate chain stitches. It creates a base for projects made in rows like headbands, blankets, and cardigans.
What are the benefits of using a magic ring?
Only the crochet magic loop will create an ideal circle and make the center hole disappear. The center of the ring is much tighter, which is why it’s popular in amigurumi because it hides the starting point. Another advantage of the magic ring is that it looks neater and is better at keeping the toy’s stuffing inside.
This technique creates a seamless start for your in-the-round projects. It provides greater control over the tension and look of the center hole. You can manually adjust the center size by pulling the tail end.
Magic Ring vs. Chain Loop
Crocheting in the round opens up a world of possibilities for creating seamless and beautifully symmetrical crochet projects like hats, amigurumi, and circular motifs.
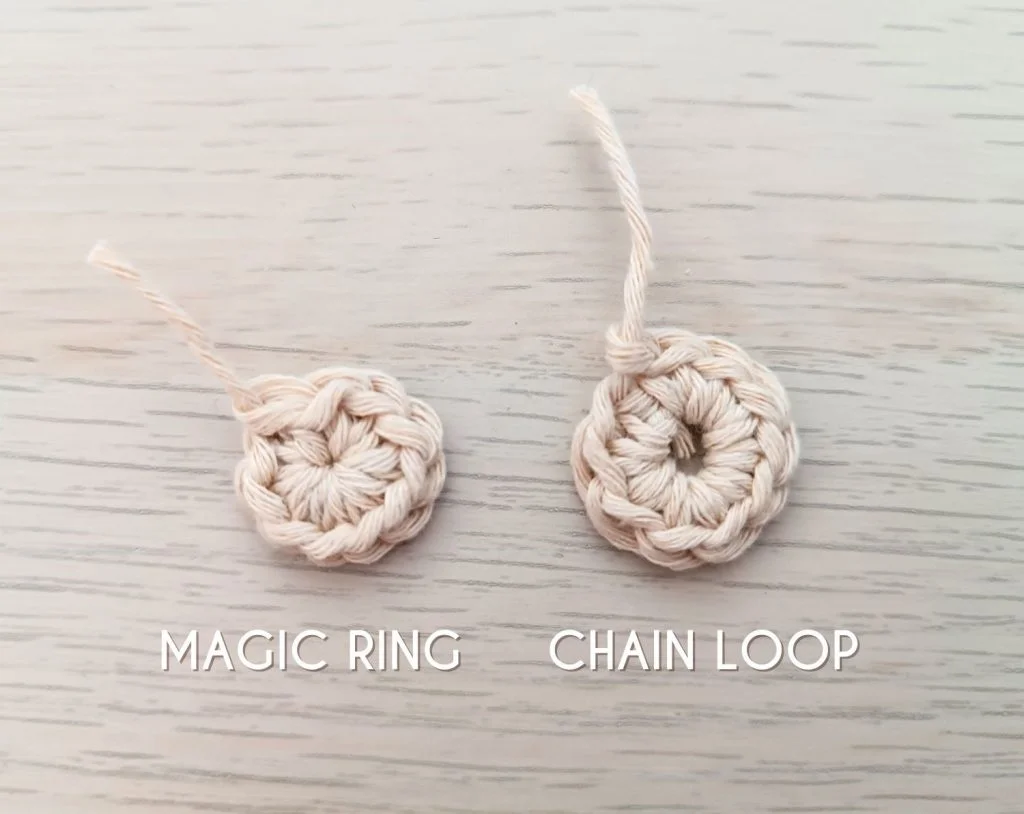
In this chapter, we will explore two popular methods for starting your rounds: the Magic Ring (also known as the Magic Circle) and the Chain Loop. Each method has its unique advantages, and we’ll discuss how to use them effectively.
How do you create a magic ring?
In this section, you will learn about two methods of creating a magic ring:
- The “Double Knot” Method – shown in the video.
- The “Wrapping” Method – shown in the photo tutorial.
Video Tutorial
Learn the “Double Knot” method alongside the video with Kate from Crochetpedia.
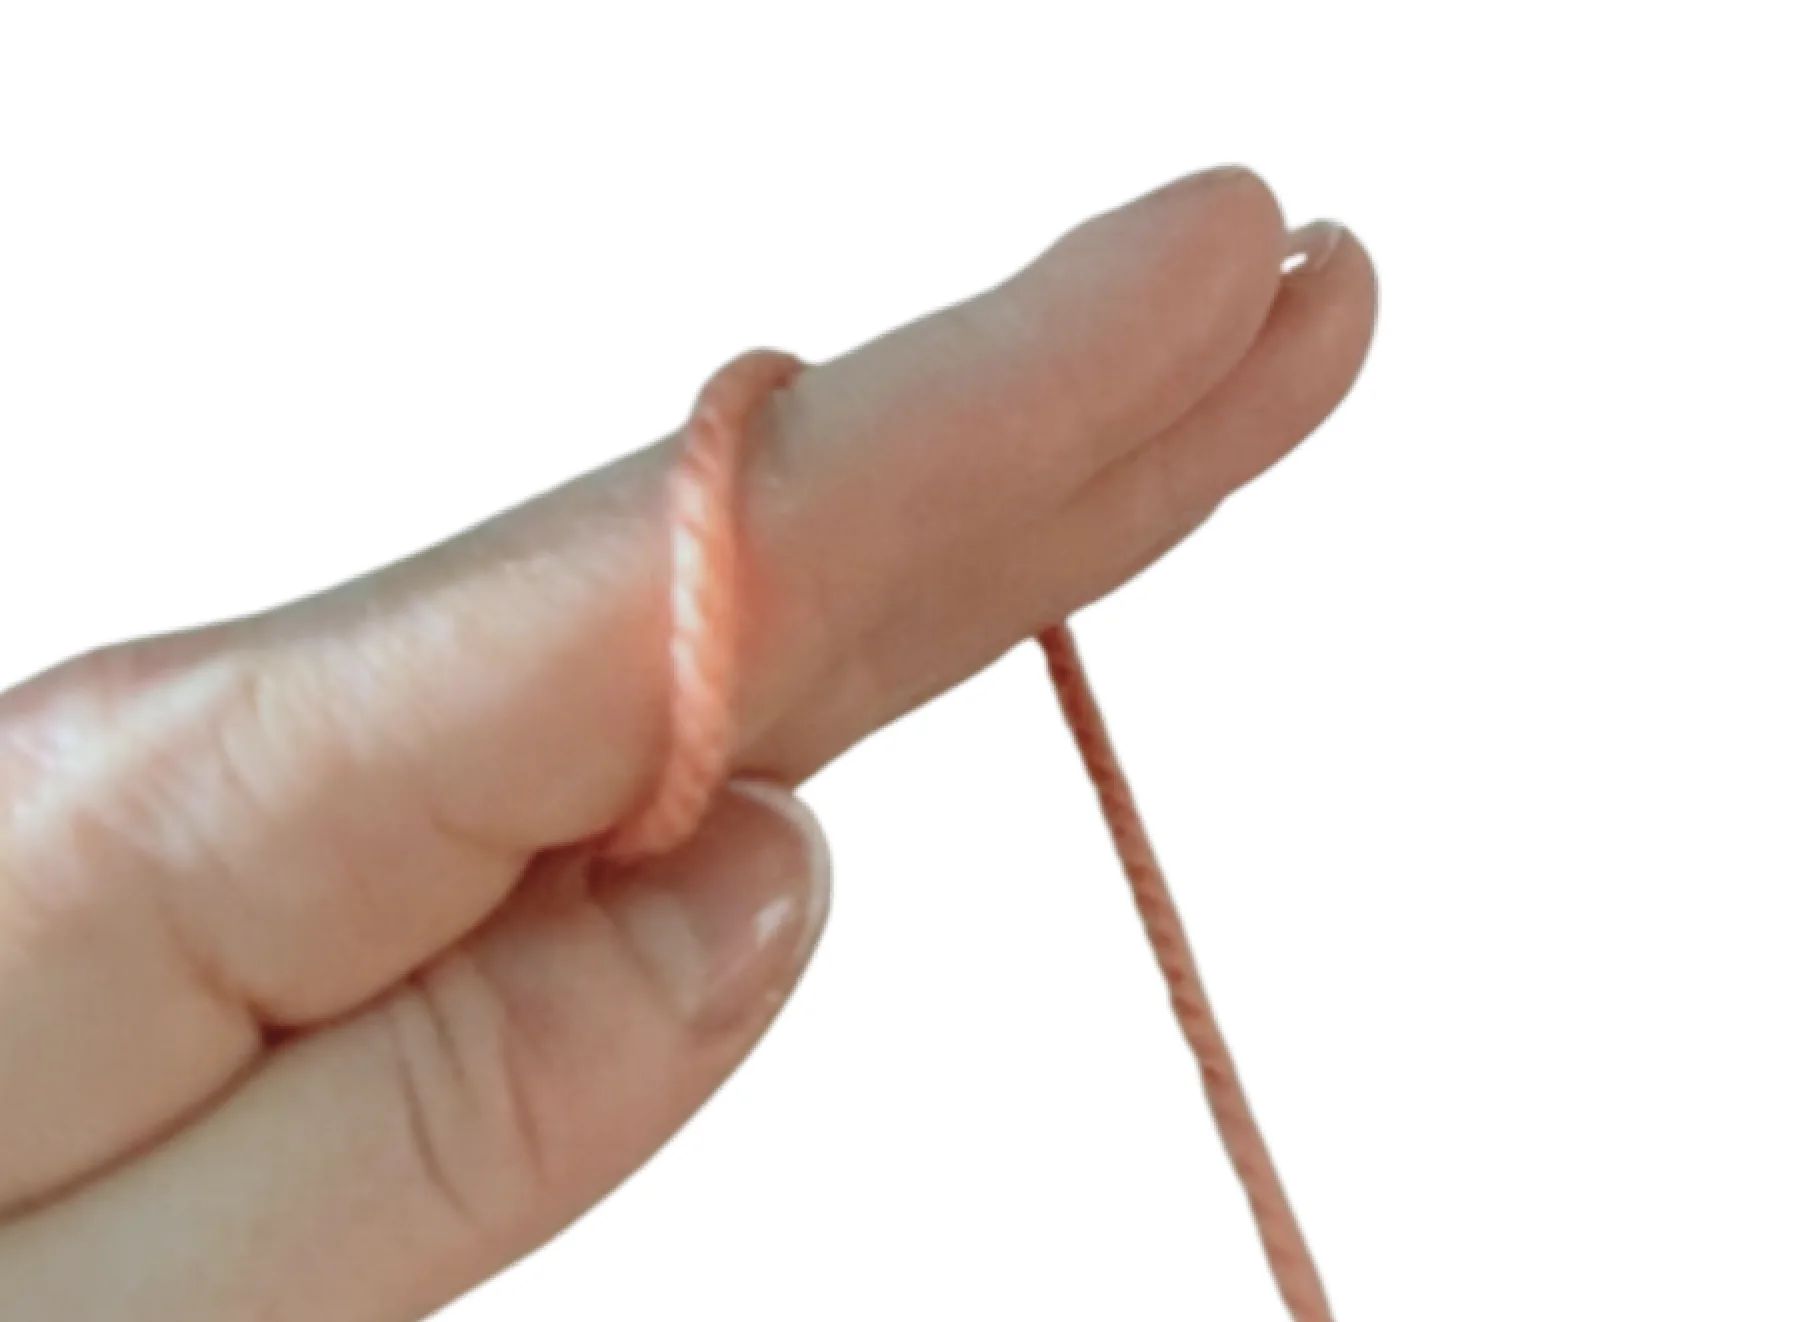
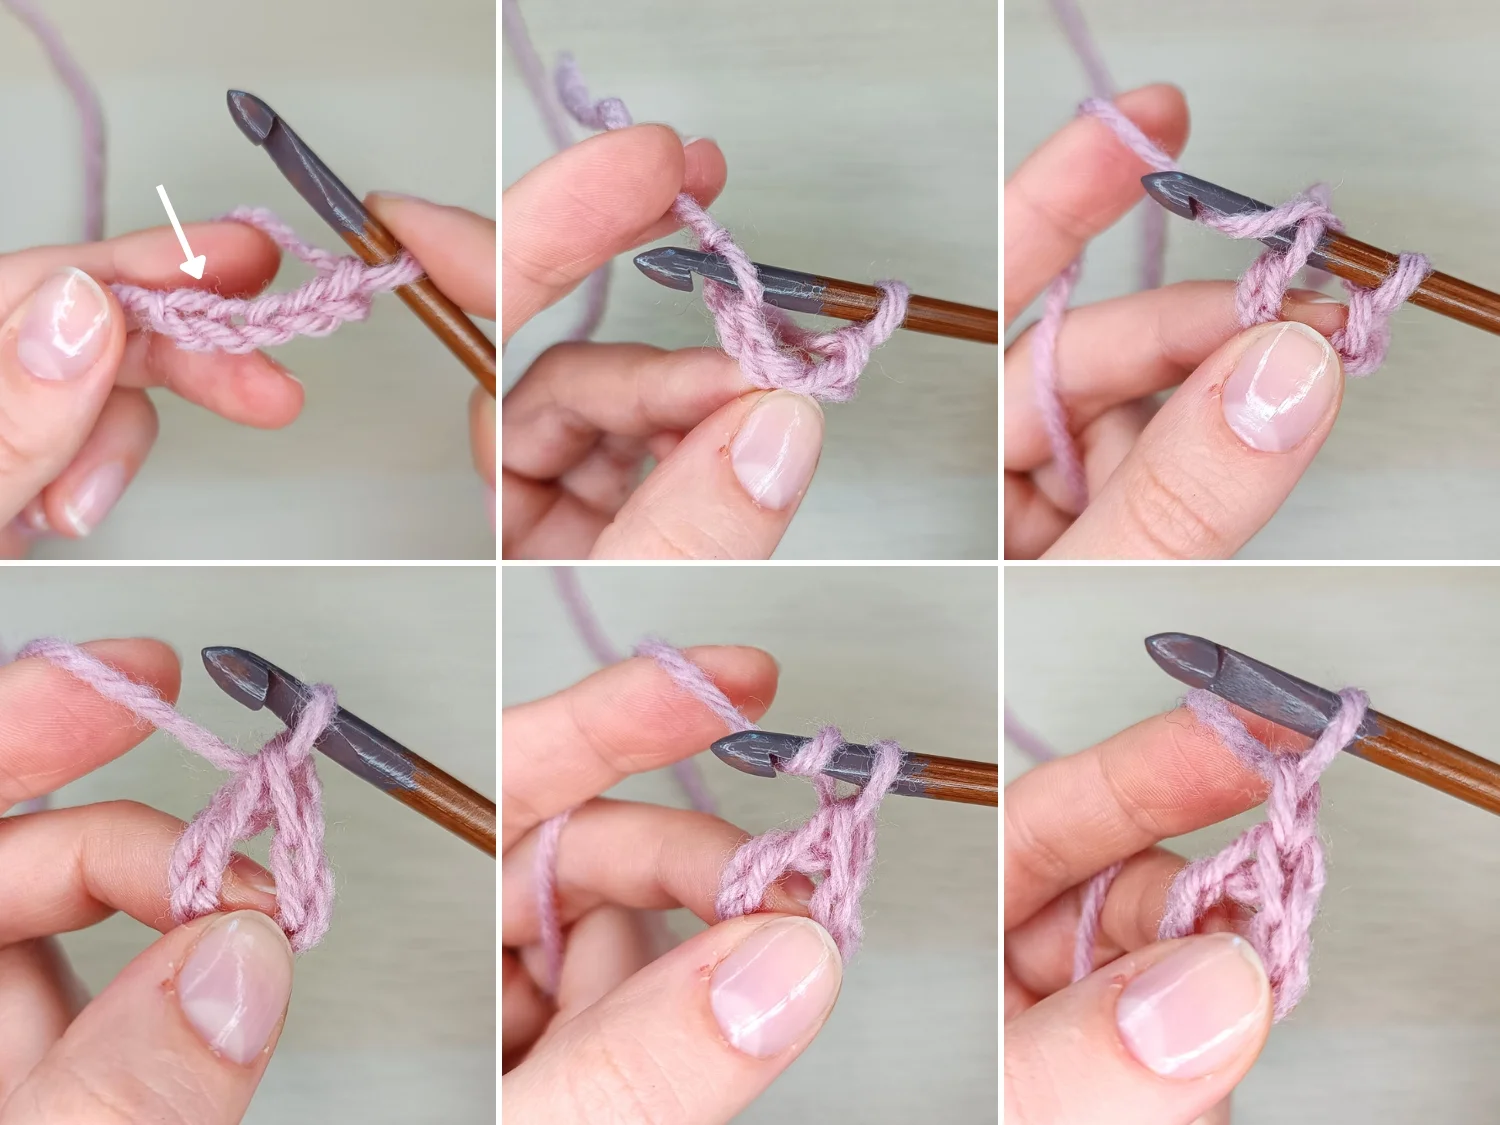
Make a Magic Ring Step-by-Step
Learn how to crochet a magic ring with the “Wrapping” method.
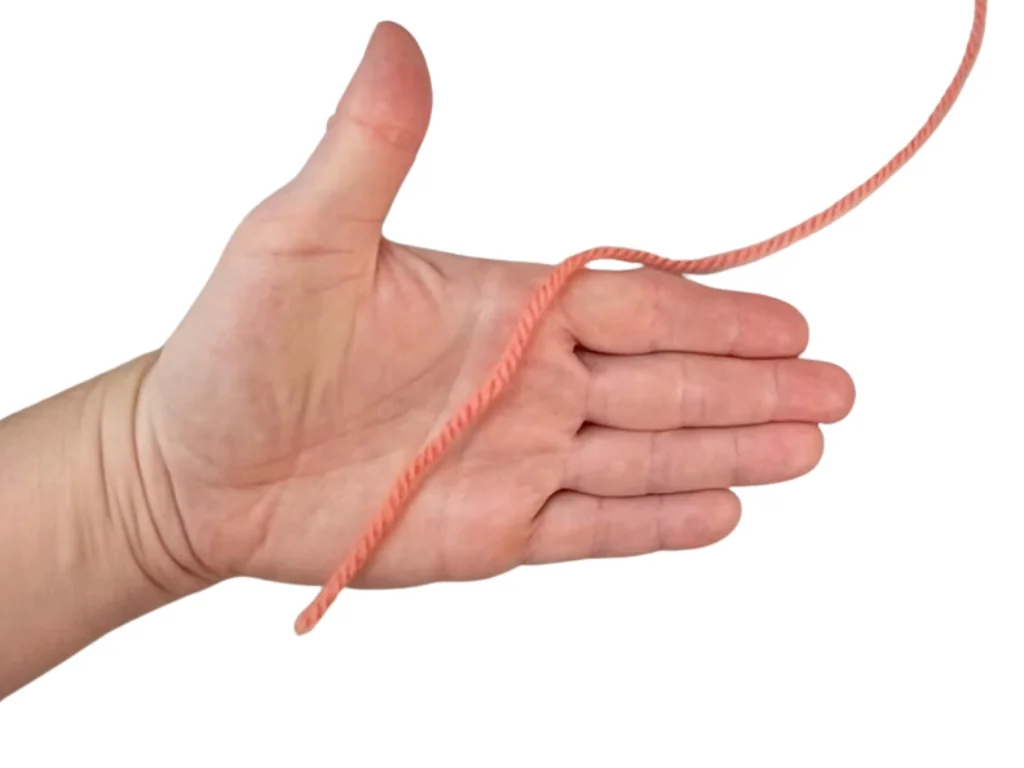
1. Place the yarn end across the inside of your palm, with the working yarn leading away.
2. Keep the yarn tail with your thumb and the rest of the yarn wrapped around the top of your fingers. The working end should be immobile to maintain tension.
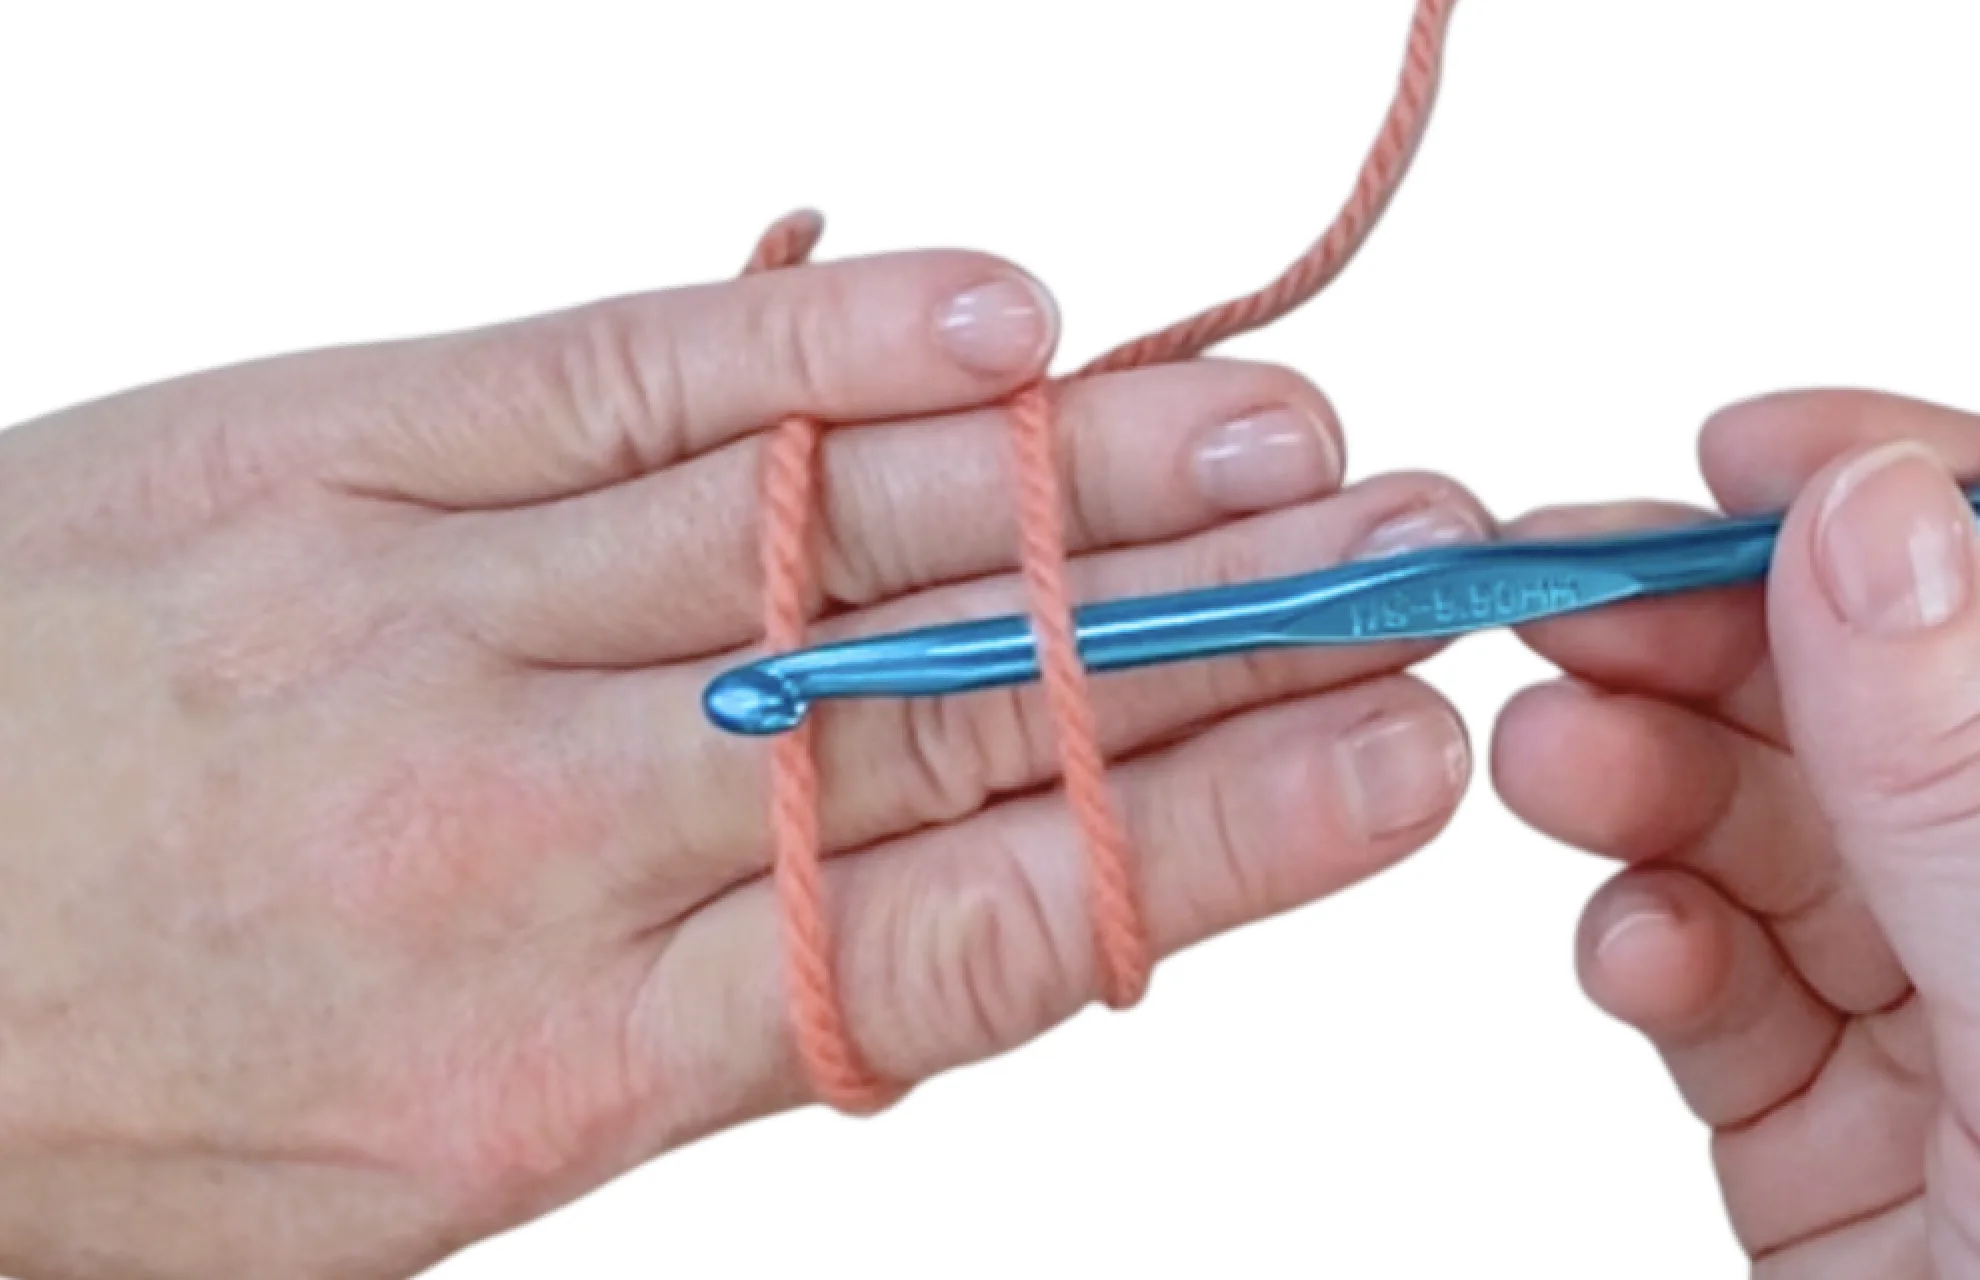
3. Wrap the yarn around your fingers again, so that you have two parallel strands on the top of your palm. Insert the crochet hook under the first strand of yarn towards your hand, then go over the second strand and hook it. Make sure to keep the rest of the yarn from moving.
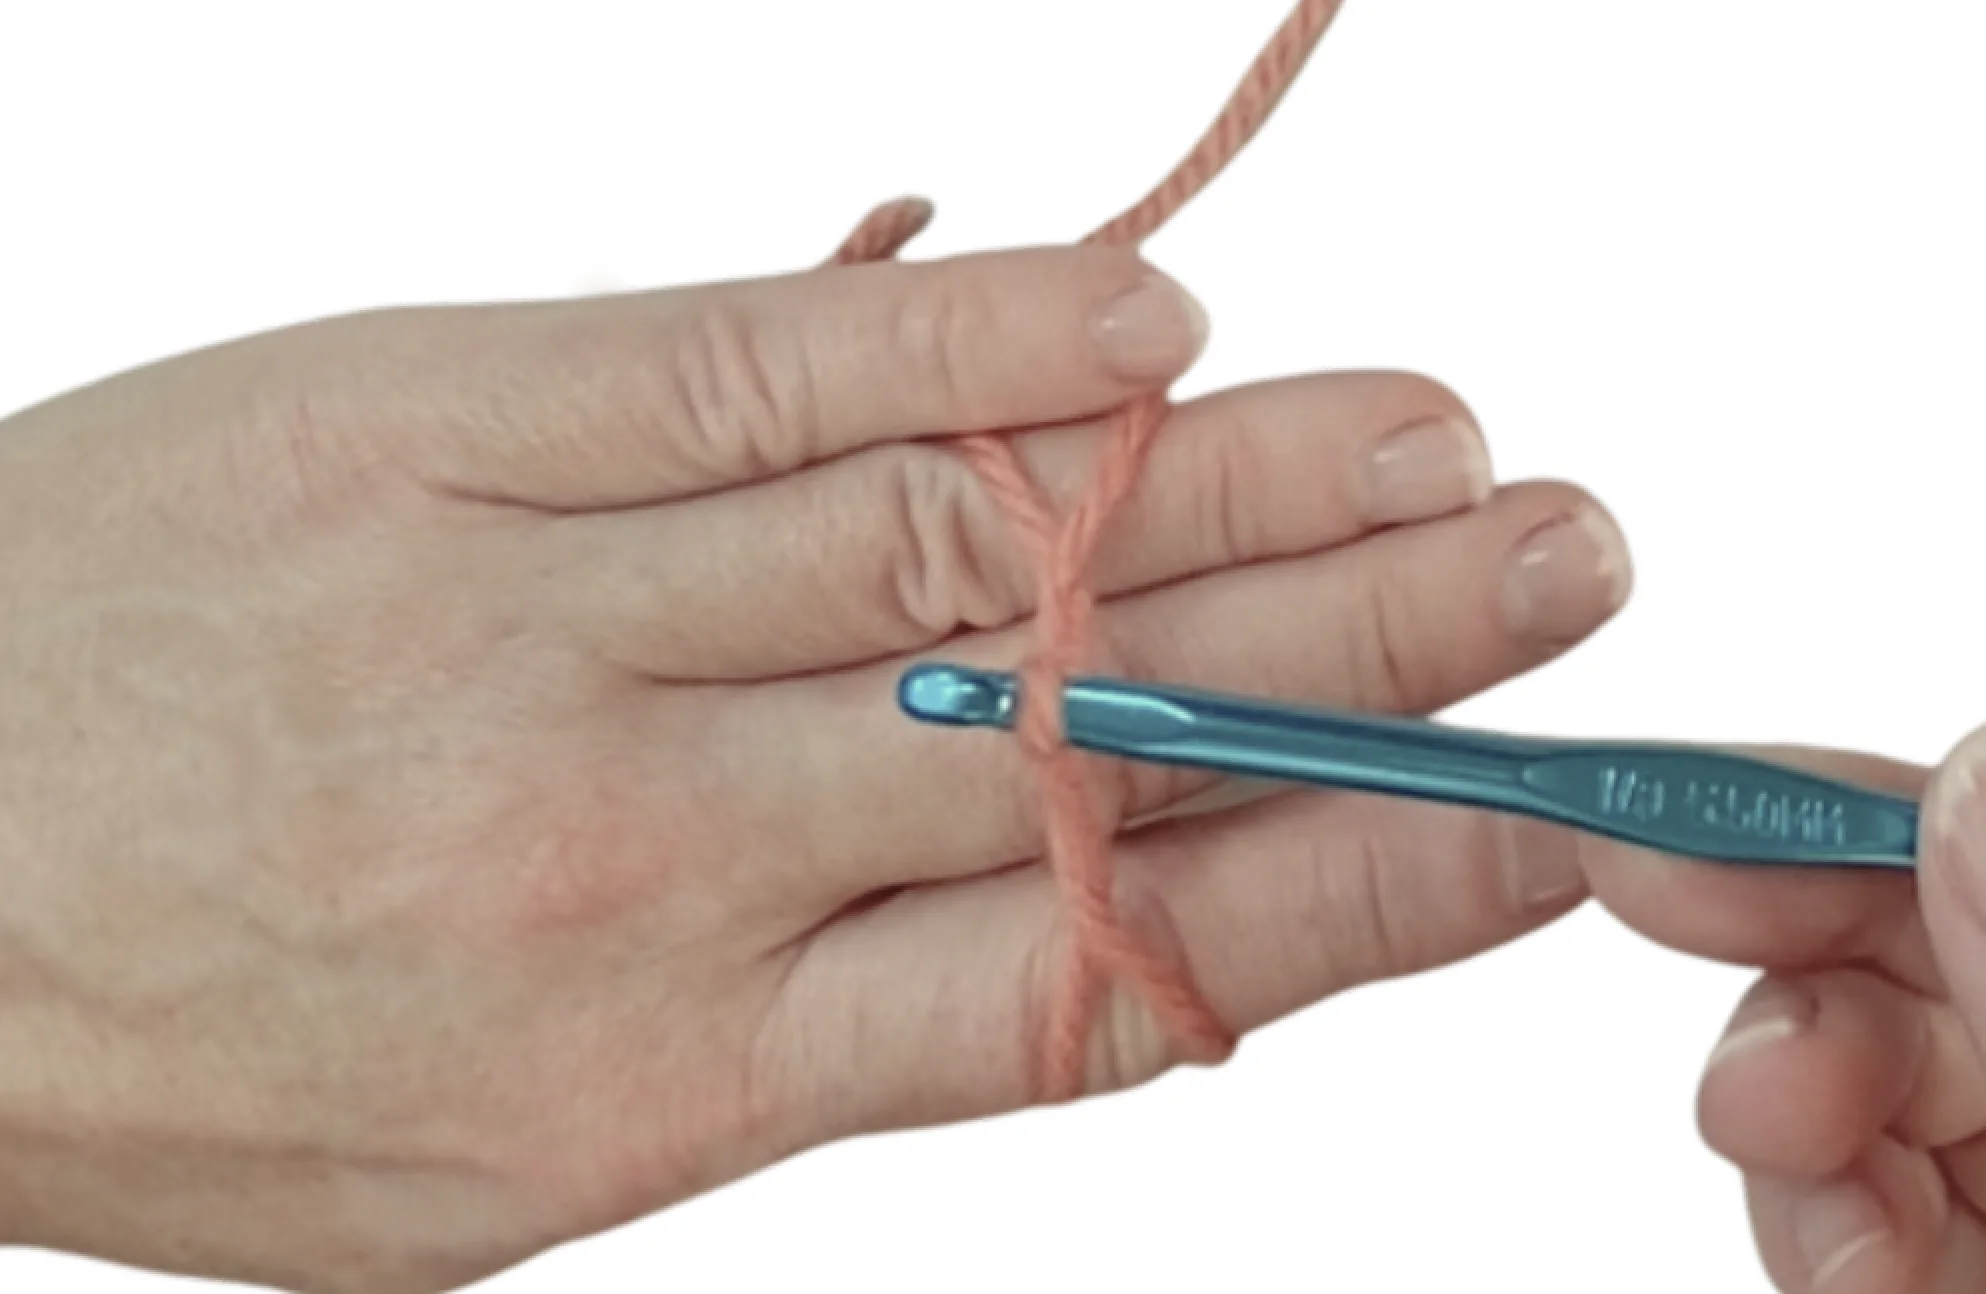
4. Pull the yarn underneath the fist strand, while turning the hook 180 degrees.
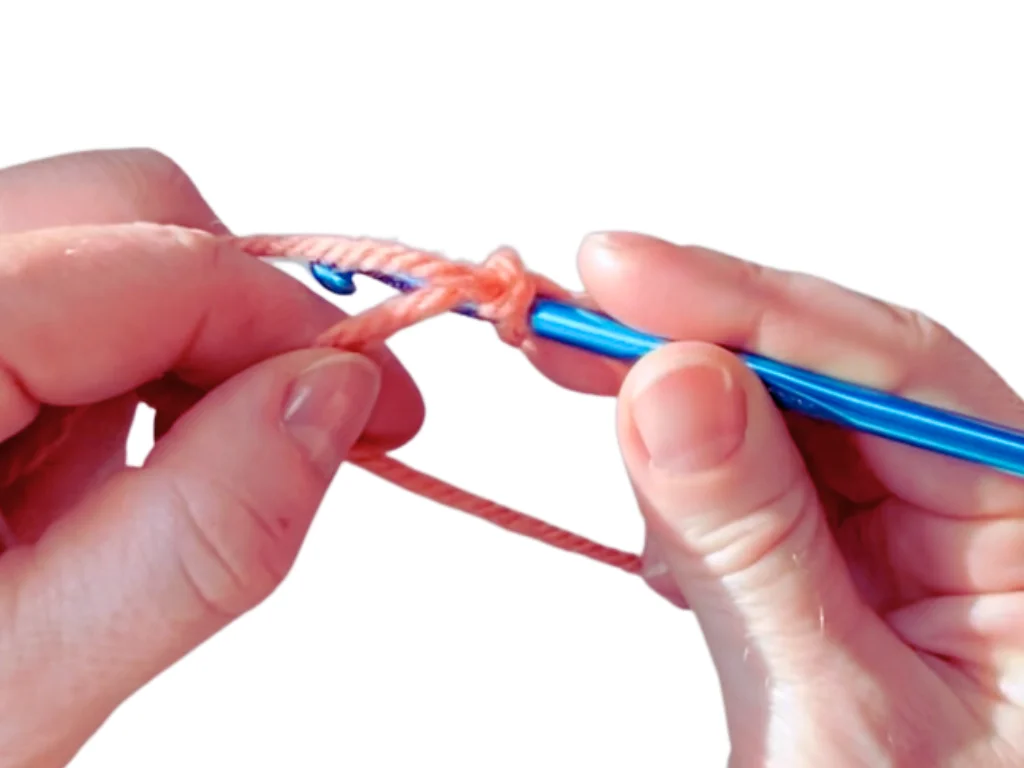
5. Insert the hook under the leftmost, upper string (it will be the working end of the yarn, which means the yarn leading to the rest of the ball). Pull the yarn over to make a chain.
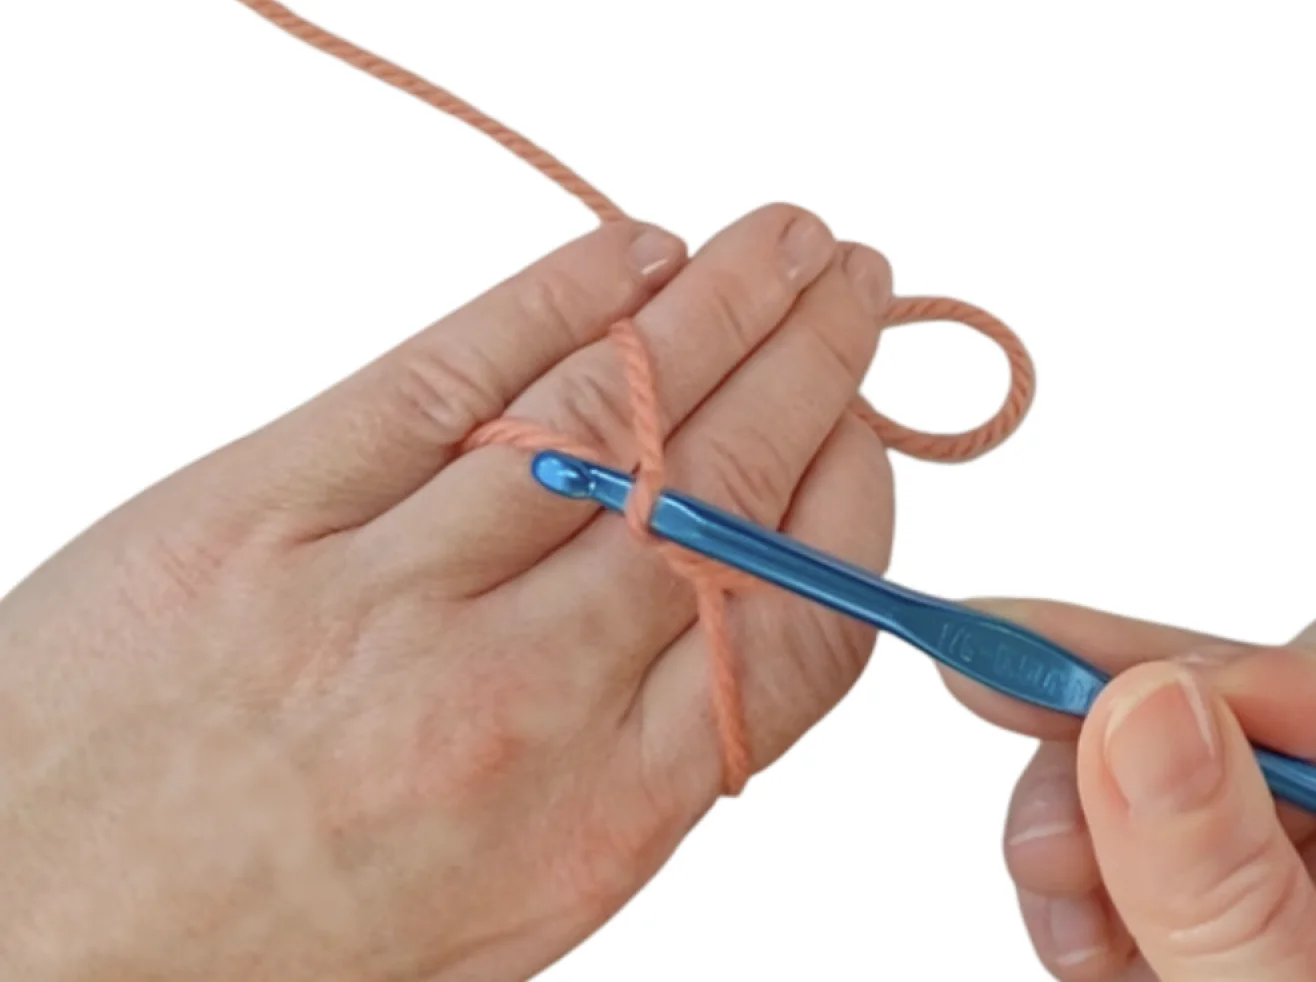
6. Slip the yarn off your fingers and take the loose end of the yarn off from the loop.
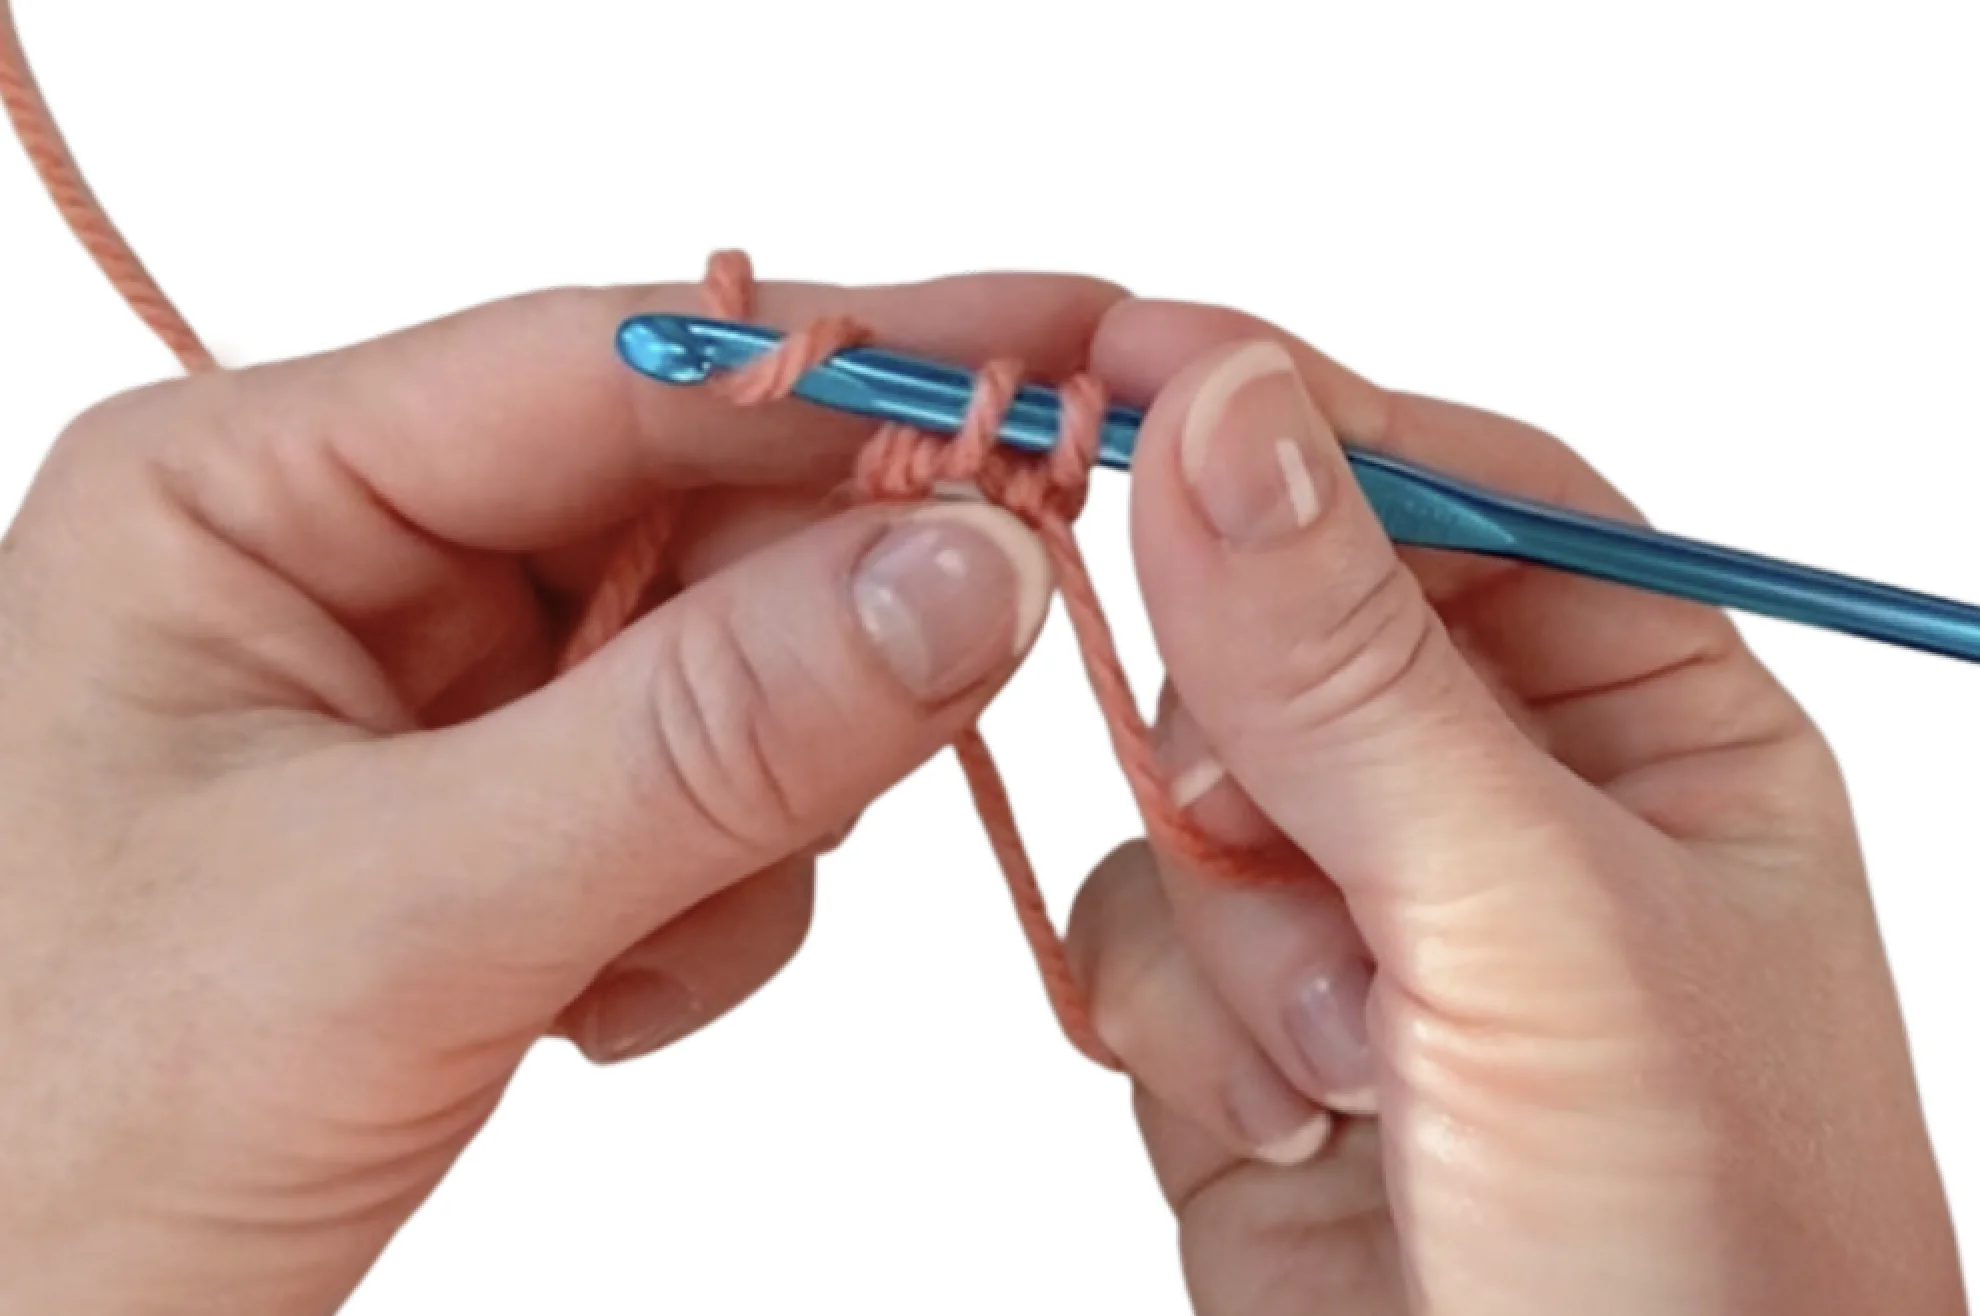
7. Wrap the working yarn around your left hand, ensuring that the loop is sufficiently large to make a first round of stitches. If it’s not, you can easily adjust it by pulling on the working end of the yarn.
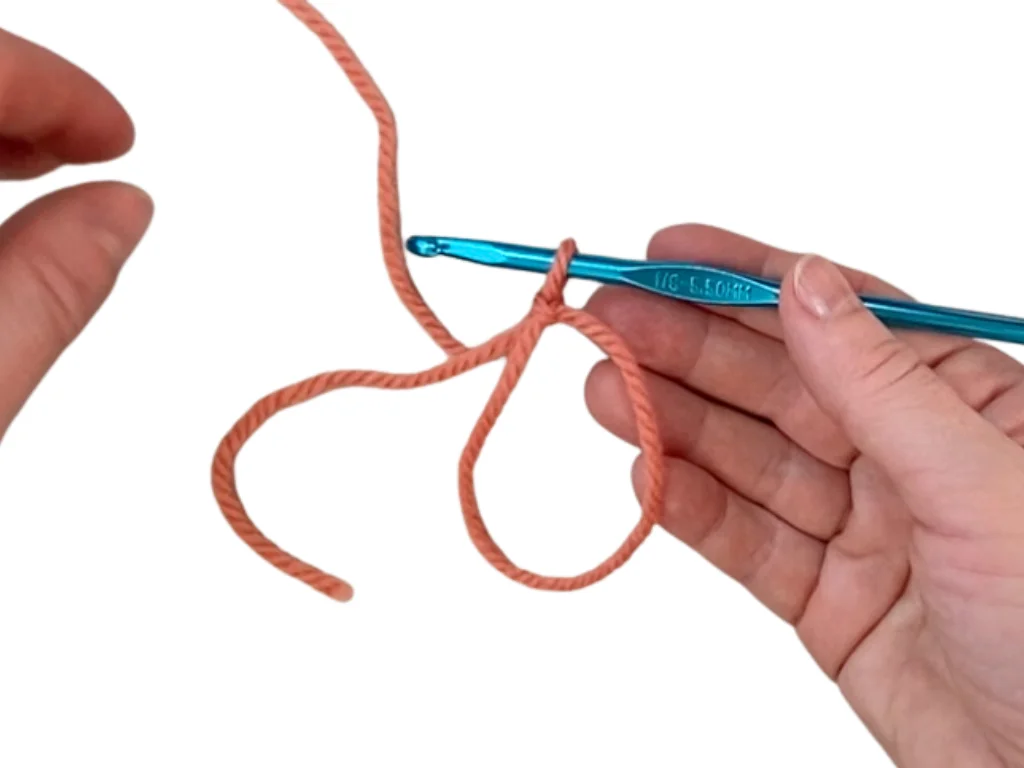
Now you can start making the first round of stitches into it.
The next step is pattern-dependent. However, in all cases, we make all stitches in the first round through the magic loop. The chain we already made in step 5 counts as the first chain. We continue with single crochet stitches.
8. Insert the hook into the loop, hook the yarn over, and pull through. Grab the yarn over again and pull through 2 loops. This is the first single crochet stitch.
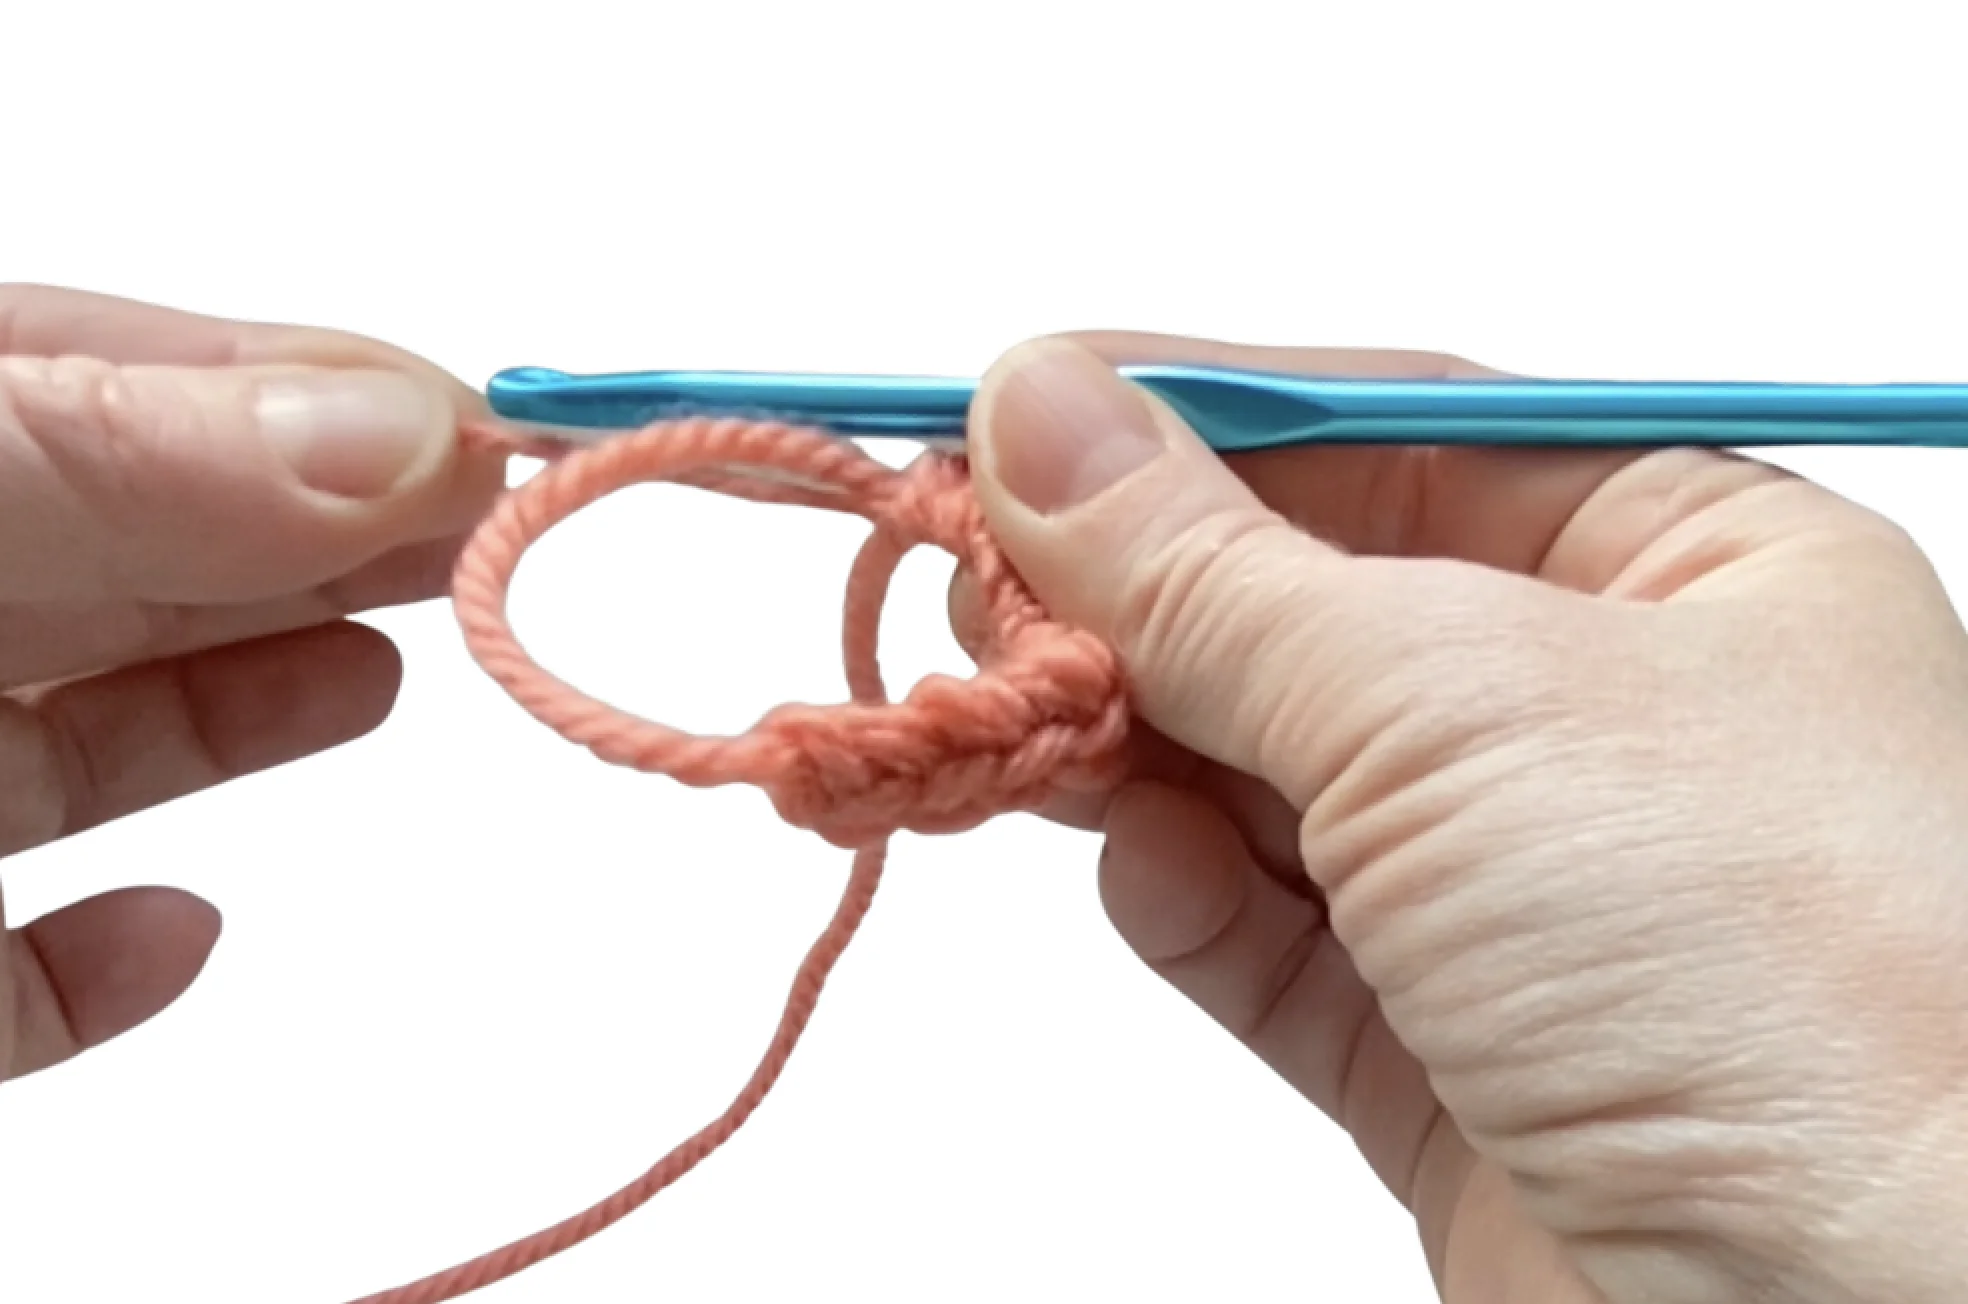
9. Continue working more stitches into the magic loop in accordance with your pattern. I made 8 single crochets, inserting the hook into the crochet magic loop each time. Now, you can close the circle by taking the tail end in your left hand and pulling it tight, while maintaining a hold on the rest of the loop in your right one.
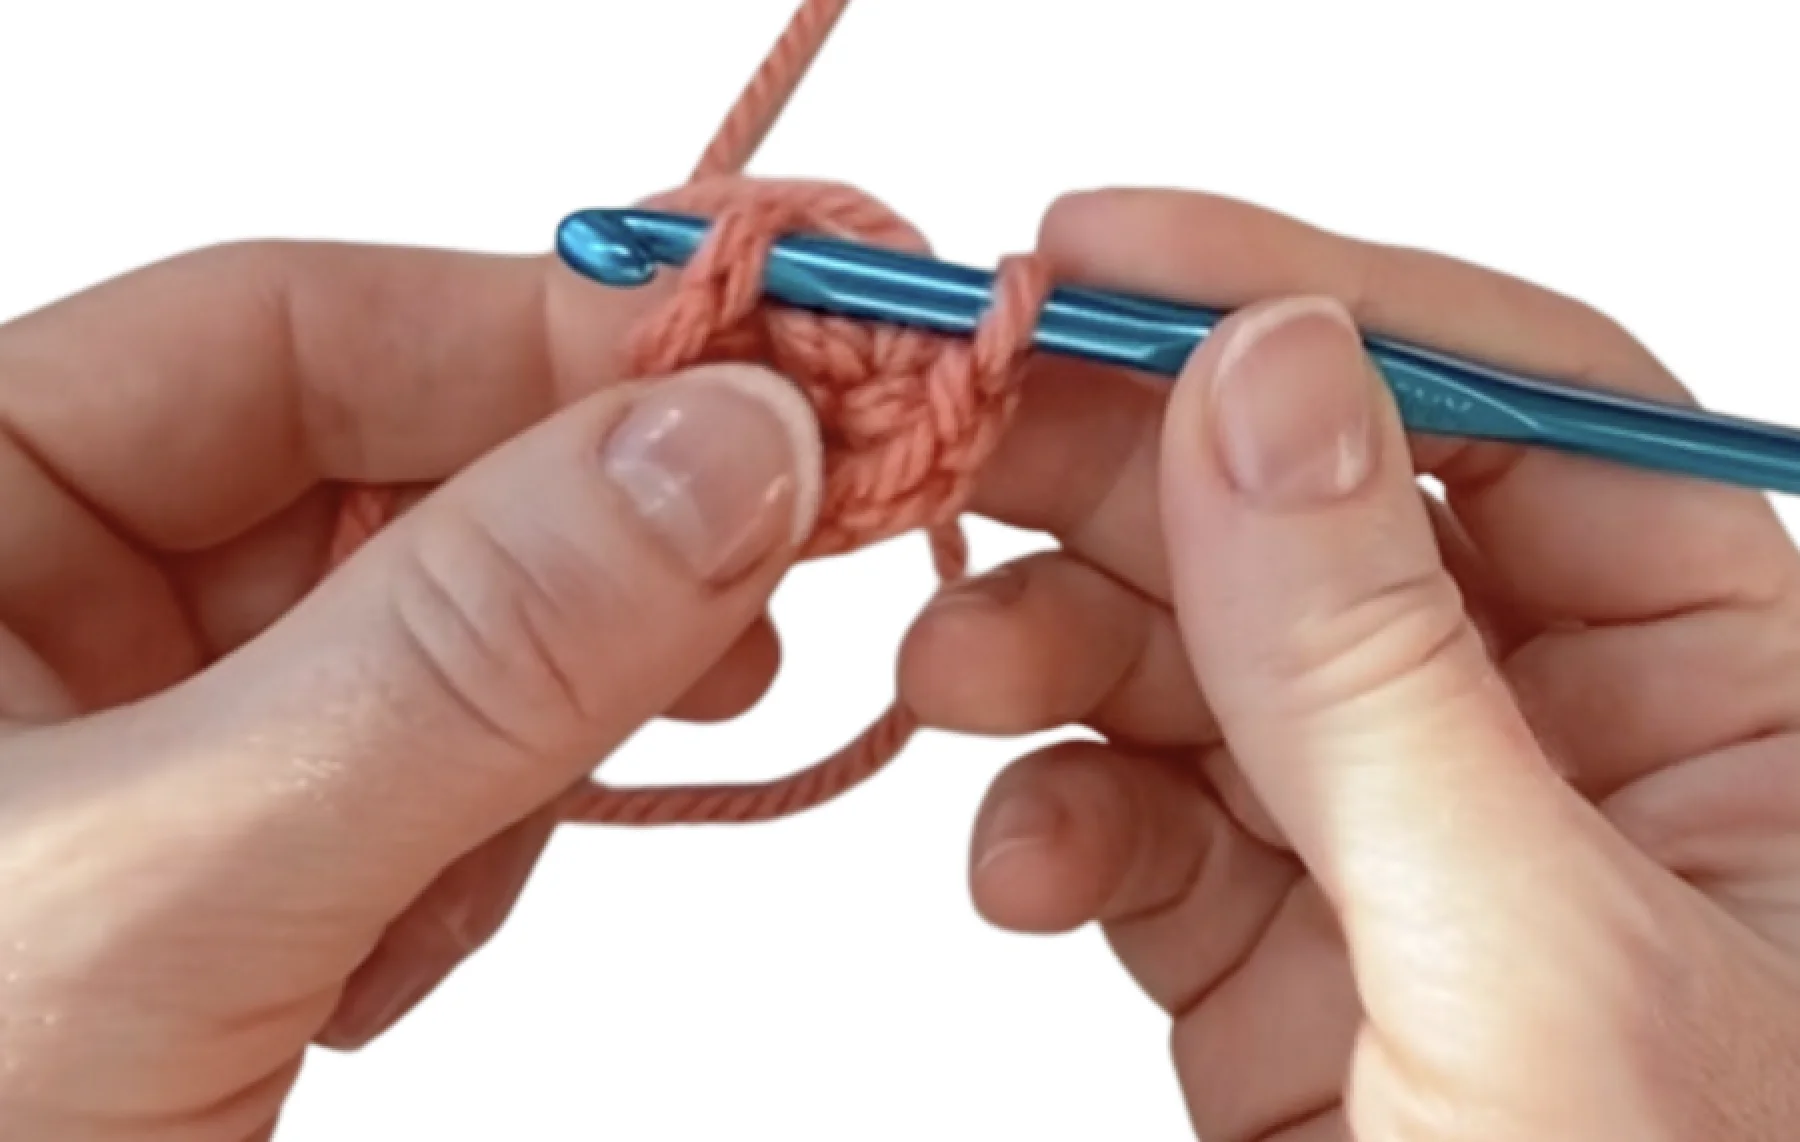
10. Use a slip stitch to finish the magic circle. To do this, insert the hook under the top two loops of the first stitch of this round, yarn over and pull through. PRO TIP: If you’re following a pattern for an amigurumi, you can skip this slip stitch. Make the next single crochet stitch to start the second round instead.
11. Finally, secure the tail end of the yarn to stop it from unraveling. Take a tapestry needle and work it through the workpiece. Pull the end again. As an added benefit, this will help tighten the ring and make the hole in the center invisible.
Tips and Tricks
These tips will help you practice magic rings more efficiently.
Troubleshooting common mistakes
Making mistakes while learning is natural and shouldn’t worry you. Here are some common problems:
- Forgetting to Secure the Ring: always secure the magic ring before starting your stitches, otherwise it may come undone.
- The Ring Comes Undone: the ring may unravel if your yarn tail is too short to begin with. It may also happen if you don’t hold it properly while working the first set of stitches into the loop.
- Difficulty Pulling Tail: if tightening of the magic ring is difficult, check if your stitches aren’t twisted. To make things easier, lay them on the table and arrange manually along the flat surface, then try pulling again.
- Loosening Ring: If your ring doesn’t want to close completely, you may have too many stitches in the starting round. In this case, the sheer amount of stitches may make it impossible to close up.
Using a stitch marker
A stitch marker can be a useful tool when working in the round. You can track the beginning or end of your rounds, which comes in handy, especially in projects with many stitches. Let’s see how to use it with a magic ring:
- Mark the first stitch you make into the loop of your magic ring. This is the beginning of the round, so when you reach the end, you will know where to make a slip stitch.
- Move the stitch markers up with each round as you continue working your stitches – it will mark the new beginning point.
- Remove the marker as you reach the end of your work.
How do you adjust the size of a magic ring?
The beauty of the magic ring lies in easy adjustment. You can do it with one movement of your hand. When you work the first set of stitches inside the loop, simply pull the yarn tail to tighten it. Keep the stitches and the rest of the loop in check to prevent it from twisting.
Remember that you can always adjust the tightness of the magic ring, as long as you have access to the yarn tail.
Adding more rounds to the magic ring
After you’ve finished the first round of stitches, you can easily add more. Usually, you should follow the instructions in the crochet pattern, as it will tell you exactly what you need to do next.
Moving to the next row is easy, depending on the type of crocheting you chose for your circular project:
- Crocheting in rows – finish the round with a slip stitch (connect the first and the last stitch of the round). Then, make a turning chain and begin another row, according to the type of stitch you chose. Remember to add increases in the right places.
- Crocheting spirally – this method doesn’t require making a slip stitch at the end of the round. Instead, begin the new round right into the first stitch, omitting the turning chain. Use a stitch marker to keep track of the round count.
Remember that adding more rounds requires making increases in the right spots. The placement of increases will impact the shape of your work. It may remain flat or start turning into a three-dimensional object.
The Chain Loop Method
The Chain Loop method involves creating a chain and joining it to form a loop, then working your stitches into the loop. It’s versatile and commonly used for a variety of circular projects like hats and doilies.
How to Create a Chain Loop
- Make a chain of the desired length, as specified in your pattern.
- Insert your crochet hook into the first chain made and slip stitch to create a loop.
- Chain one to create a turning chain (counts as the first stitch or not, depending on your pattern).
- Crochet the required stitches into the loop, following your pattern instructions.
Advantages of the Chain Loop
- Easy to learn: The Chain Loop method is beginner-friendly and straightforward to master.
- Versatile: It can be adapted for various projects and stitch patterns.
- No need to adjust: Unlike the Magic Ring, there’s no need to adjust the tightness of the center hole since you control the size with your initial chain.
Choosing the Right Method
Both the Magic Ring and the Chain Loop are excellent methods for crocheting in the round, and your choice depends on your project’s requirements and personal preferences.
Here’s a quick guide:
- Use the Magic Ring when: You want a secure, adjustable center with no visible hole, perfect for amigurumi and projects requiring a tight start.
- Use the Chain Loop when: You prefer a simpler, versatile method, or your project doesn’t require an extremely tight center.
Experiment with both techniques to see which one works best for your projects, and soon you’ll be crocheting in the round with confidence and ease.
Advanced Techniques
Using the magic ring for different crochet stitches
The best thing about the magic ring is its versatility because you can use it with virtually any stitch worked in the round. While the number of stitches in the initial round may vary, the neat closure of the adjustable loop stays the same.
When you have the loop ready with its first round, then you can proceed with various crochet stitches. Whether you want to go for granny stitch, lacy techniques, or other, you are set for success.
Incorporating the magic ring into patterns
When you start a new crochet pattern worked in the round, check what type of beginning the designer requires. If it’s the chain loop, you can try changing it to an adjustable ring. Use this method whenever you see the need for a tightly closed loop.
Read more about this subject on our other websites
FAQ
Can you use a magic ring for any crochet pattern?
You can use this technique for most crochet patterns that begin with a circle. That includes amigurumi, crochet flowers, triangular shawls, and mandalas. To easily elevate the look of this type of project, use a seamless and adjustable starting point.
Are there any alternative methods to creating a magic ring?
Yes, you can use the chain loop method. Make a chain, form a loop, and close it with a slip stitch. Then, work your stitches inside this loop, but remember that you can’t adjust its size.
Is a magic ring difficult to master?
While it may require some practice and at first seem confusing, mastering the magic ring is not difficult.
For the easiest method, see the video, and don’t forget to practice.
How do you tighten a magic ring?
You can tighten the loop by pulling on the tail end. Hold the loop in place until it closes, then adjust the tension if needed. Keep an eye on the stitches and fix the twisted ones before tightening the loop completely.
Can you use a magic ring for amigurumi projects?
Yes, in fact, it’s the most common way of starting amigurumi. Not only does this loop look best, but also keeps the filling from coming out. Creating seamless and tight circles for the toy’s body parts is crucial.
Are there any common mistakes when creating a magic ring?
Beginners often forget to leave the yarn tail long enough, which results in the ring unraveling. Creating too loose or too tight of a ring, or not pulling the tail end tightly enough, are common mistakes. Slow practice and repetition are key to mastering this technique.
Can you use a magic ring for flat crochet projects?
Of course, because you determine whether your project is flat or not in the next rounds. The beginning, which is the adjustable loop and the initial set of stitches, always lay flat. Then, it’s up to you how many increases you make in the subsequent rounds.
How do you finish off a magic ring?
Consider these two crucial points:
- Securing the magic loop on the hook – when you create a loop, you make a chain stitch that attaches it to the crochet hook.
- Slip stitch at the end of the round – when you finish the first round of stitches, you join the first and the last stitch with a slip stitch.
To finish off the work completely, pull the yarn and cut it, then weave it in using a tapestry needle.
Can you use a magic ring for Tunisian crochet?
We don’t use this technique in Tunisian crochet because of the nature of the Tunisian stitches. This type of crochet typically begins with a foundation chain.
How do you troubleshoot a magic ring that keeps unraveling?
If your adjustable loop keeps unraveling, firstly ensure your yarn tail is long enough. See if you are wrapping the yarn right, and if you are pulling the tail end tightly. Practice on various hook sizes and with various yarn types to see which works best for you.
Lastly, try out several crochet tutorials to find the method and the instructions you understand.
Summary
The magic ring is a versatile technique to start crocheting in the round. It produces a nice and tight center, which is useful in many types of projects. You will find it in amigurumi crochet patterns, crochet mandalas, granny squares, etc.
Mastering this technique is crucial for leveling up your crocheting game and tackling more advanced crochet patterns. We hope that this article, video tutorial and written instructions helped you learn it. You can now confidently use it in future projects.